
Checking for Object Collisions with Ray Cast
-
Prerequisite
Introduction
When a car or an avatar is moving, it might collide with other objects. We need to make sure this is simulated realistically. For example, an avatar should not walk through a wall.Besides checking their distances, we can also use a method called “ray casting”. This method is more convenient when there are many objects that you need to check for collisions.
The Collider
To check if a player object (an avatar or a car) is colliding with another object, we first need to define the boundary of the player. To keep it simple, we assume the player is wrapped by a box. We can call it the “collider”. The size of this collider is calculated automatically based on the size of the player object.
When this collider box touches another object, we know there is a collision:
Ray Casting
To find out whether the collider box is touching another object, we use a technique called “ray casting”.The basic idea is that we draw short lines from the center of the collider box in all 6 directions (up/down/left/right/front/back). These lines are called “rays”.
When the player object (e.g. an avatar or a car) moves, the rays will move with it. As the player object moves close to a blue wall, the ray in his front direction will touch that wall first. The ray will report the point where it intersects with the wall, which is called the “intersection point”. Now we can calculate the distance between the player object’s front face and the intersection point.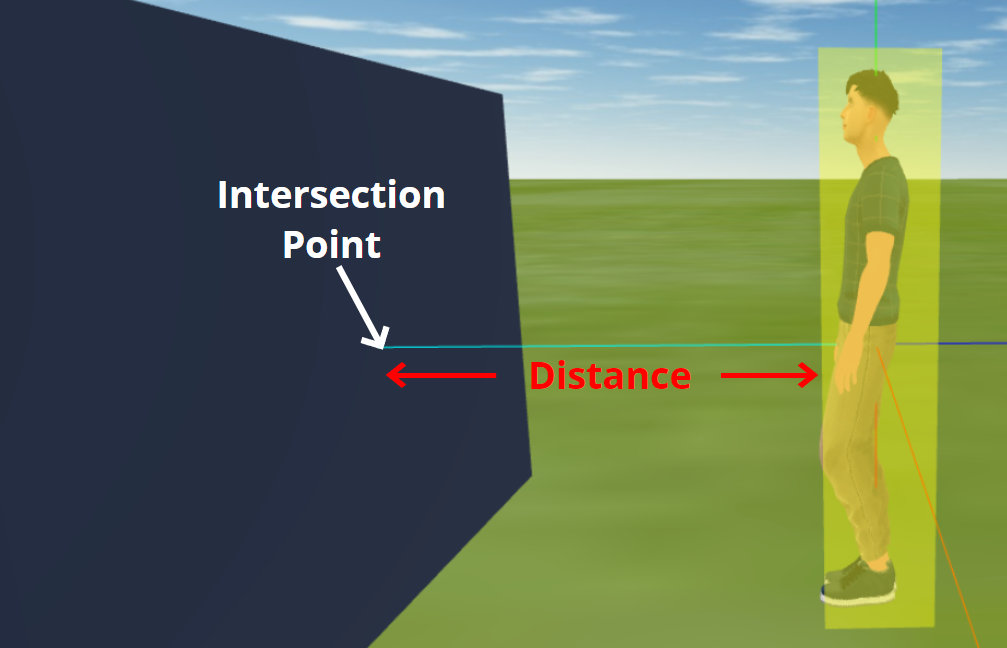
This distance decreases as the player object moves closer to the wall, so when the distance drops to 0, we know the player object’s front face is touching the wall. On the contrary, if the ray is not intersecting with any object, then we assume there is no obstacle.
The same method can be used in the other 5 directions.Now let’s look at how you can enable collision detection in your program.
The “Turn on Collision” Block
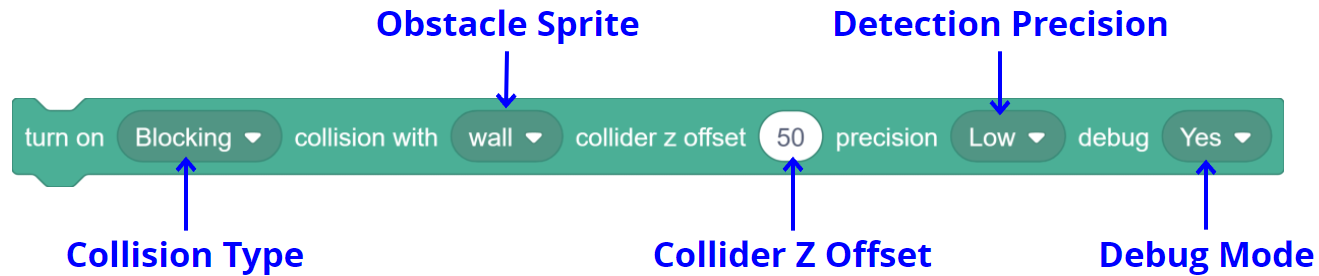
This block turns on the collision detection for the player object. Note that it only works when you are moving the player object by setting its speed.In addition, if you run this block multiple times, the collider box will be determined by the last block’s parameters.
Parameters
Collision Type
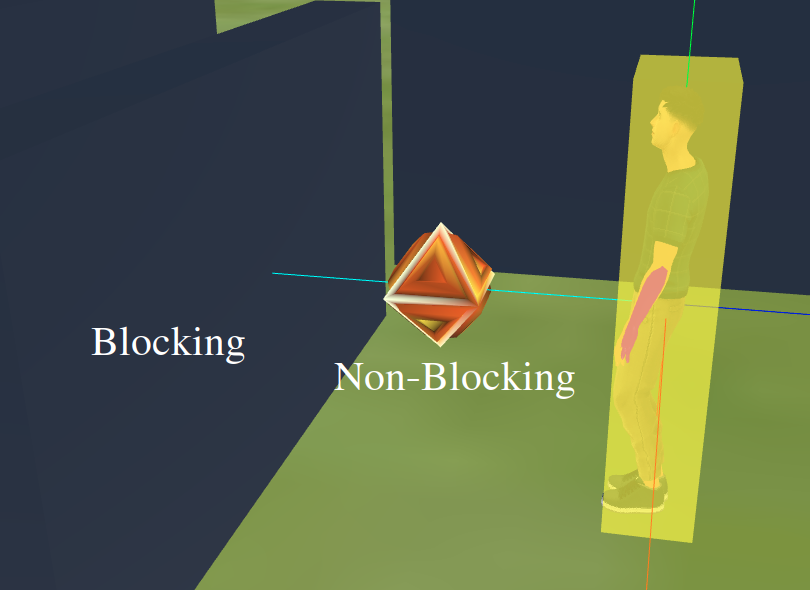
There are 2 types of collisions: “Blocking” or “Non-Blocking”.- If you want to stop the player when there is a collision, such as when hitting a wall, you should use the “Blocking” type. Note that the player object can only be stopped when you are using “set speed” to move the player object. In other words, if you are setting the x/y/z position of the player object directly, then it will not be stopped by the colliding object.
- If you want to keep the player moving, such as when it collects a gem for reward, you should use the “Non-Blocking” type.

Obstacle Sprites
This is where you specify which sprite will collide with the player. Note that you do not specify the obstacle objects one by one. Instead, you specify a sprite, so that all objects created from that sprite will be obstacles.For example, if you need many walls in a game, then all of these wall boxes can be created within one sprite named “wall”, and they will all collide with the player after you run this “turn on collision” block.
Here is an example of setting up a blocking wall and a non-blocking gem. The 2 “broadcast” blocks would create the wall boxes and add the gem in 2 other sprites, then you can turn on blocking collision with the “wall” sprite, and non-blocking collision with the “gem” sprite.

Collider Z Offset
This number allows you to adjust the Z position of the collider box. For some objects, such as avatars or buildings, their positions only tell us where their bottom points are, not their center points. This will cause the collider to be too low. So we just need to add some offset to the Z position of the collider.For example, for an avatar that is 100 in height, the Z offset should be 50:
Detection Precision
You can use this setting to control how many rays are used for detecting collisions:- Low: This means we will only use 6 rays, one in each direction. All 6 rays are originated from the center of the player box, so if a small obstacle is not hit by the ray, then it will not be detected.
- High: This means we will use 26 rays, 3 in the left and right directions, and 5 in the other 4 directions. More rays will require more computations, but they will also be able to detect more obstacles.
- Bottom Front: This means we will only use 2 rays, one in the bottom and one in the front. This is the fastest mode, and it is usually good enough if we are building simple games.

Debug Mode
This choice controls whether you want to show or hide the collider box and rays. Usually, you should set this option to “Yes” when you are developing or debugging your program, then set it to “No” when the project is completed.
Demo
Here is an example project that you can try to play with:play.creaticode.com/projects/151ec87b5f86b37b1bc8154f
Checking If the Avatar is Blocked
You can use this reporter block to find out if the avatar is being blocked in one of the 6 directions. A value of “0” means the avatar is not blocked in that direction, and a value of “1” means the avatar is blocked.
Demo
In this demo, the variable “sprite object blocked front” is 0 at the beginning, but when the avatar is blocked by the wall in the front, that variable is updated to 1 by the system.
The Colliding Event Block
You can also use this hat block to handle the collision event.
In the dropdown, you need to select the name of the sprite that contains the blocking object, such as the “wall” sprite that adds all the blocking boxes. You must have turned on a blocking or non-blocking collision with that sprite first.
Whenever a collision occurs, this hat block will be triggered. In addition, the object that is in a collision will become the “sprite object” for the current sprite. For example, if you run this hat block in the “wall” sprite, then the one wall box that is colliding with the avatar will become the sprite object for the “wall” sprite.
Demo
In this demo, whenever the avatar collides with the wall box, we move it back to the starting point and make it go forward again. Note that you have to set the “forward speed” again, since when the avatar is blocked, its forward speed is reset to 0 to make it stop.
See Also
-
I CreatiCode pinned this topic on
Hello! It looks like you're interested in this conversation, but you don't have an account yet.
Getting fed up of having to scroll through the same posts each visit? When you register for an account, you'll always come back to exactly where you were before, and choose to be notified of new replies (either via email, or push notification). You'll also be able to save bookmarks and upvote posts to show your appreciation to other community members.
With your input, this post could be even better 💗
Register Login