
Game AI for <Candy Truck Battle> - Part 2 (Difficulty: 5)
-
Introduction
In part 1 of this tutorial, we built a basic AI controller for the game. That AI could already move the truck to random locations, and even seek and attack the opponent.
In this second part, we’re going to supercharge our AI! We’ll add two major new skills: collecting power-ups and avoiding tree obstacles. With these upgrades, our AI will become a much tougher competitor in battle.
Here is a demo of what we’ll be building:
Version 4 - Collecting Powerups (Difficulty: 4)
To get our truck to collect powerups, it first needs to know where they are. Then, it has to drive over to them. A key part of the logic will be deciding when to go for a powerup versus when to keep attacking the opponent.
Step 1 - Duplicate the Previous AI Code
We’ll be building on the AI controller we made in Part 1 (Version 3). Go ahead and open that project, and then save a copy of it. This way, you’ll always have the original version to go back to if you need it.
Step 2 - Check for Powerups
To collect powerups, our AI first needs to know that they’ve appeared on the map. It only makes sense to change the truck’s behavior after a powerup is available. The best spot for this check is right at the start of our main
foreverloop.Let’s create a new custom block and name it
check powerups. Important: Make sure to check the box for “Run without screen refresh.” This gives our code a nice little speed boost.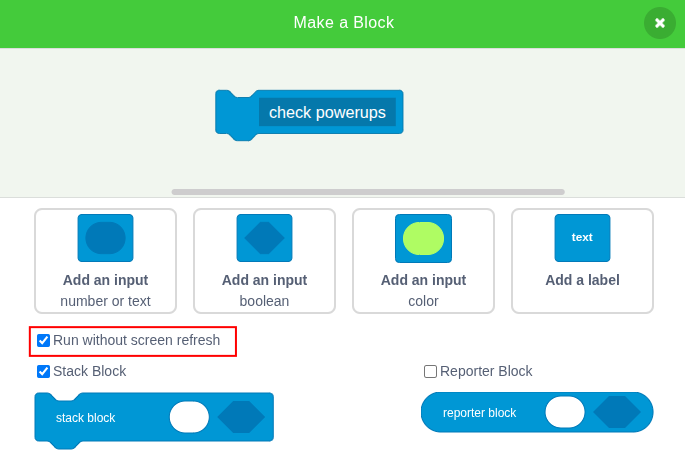
And we will place this new block at the beginning of the main loop: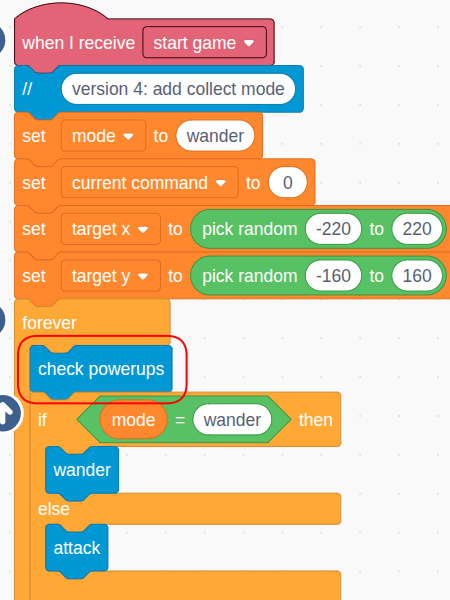
Step 3 - Check Our Life Count
Remember, there are two types of powerups in the game:
- Sugar: Increases our truck’s life count (up to a max of 3).
- Gas: Boosts our truck’s speed (up to a max of 120).
It makes sense to prioritize survival. If our truck has fewer than 3 lives, getting a Sugar powerup should be the top priority. Let’s start by adding a check for that.

Note that the☁ my livesvariable keeps track of the life count for our truck, which is identified by themy teamID. This sensing block is very handy when you need to access any private property of a clone so long as you know its ID.
Step 4 - Look for Sugar Powerups
If our truck needs health (meaning it has less than 3 lives), it’s time to scan the area for any Sugar powerups. We can do this using the special
find clones ofsensing block.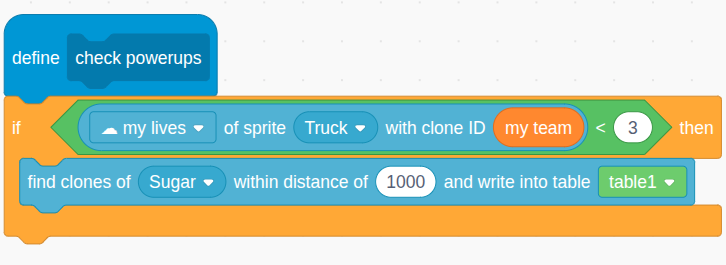
This block is incredibly useful. It searches for all visible clones of a specific sprite within a certain distance. Since we want to find Sugar anywhere on the map, let’s use a large distance like 1000. Any Sugar clones it finds will be listed in thetable1variable.
Step 5 - Check If Table1 is Not Empty
If the
find clones ofblock successfully located one or more Sugar sprites, it will add them as rows totable1. So, to see if we found anything, we just need to check if the number of rows intable1is greater than 0.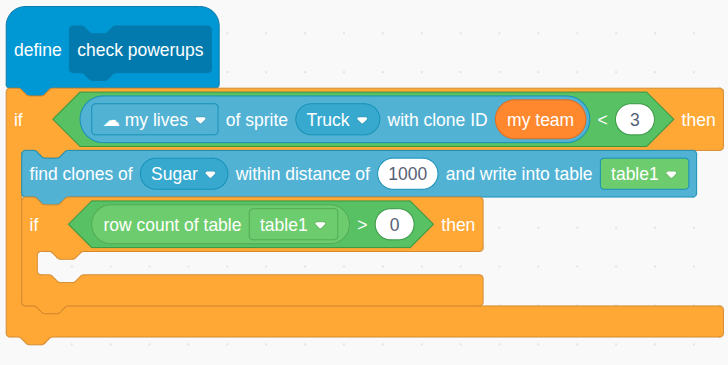
Step 6 - Update Mode and Target Location
Okay, we’ve found a Sugar powerup! The next step is to drive to it. The
table1is conveniently sorted by distance, meaning the very first row always points to the closest clone. For example, this screenshot shows that one Sugar clone was found. It has a clone ID of1, is located at X: 160 and Y: -65, and is 96.43 units away from our truck.
Now, we could create a whole new mode like “collect sugar,” but there’s a clever, simpler way. We can just reuse our existingwandermode! All we have to do is update thetarget xandtarget yvariables with the location of the Sugar item. The existing code in thewanderblock will then automatically navigate our truck right to it.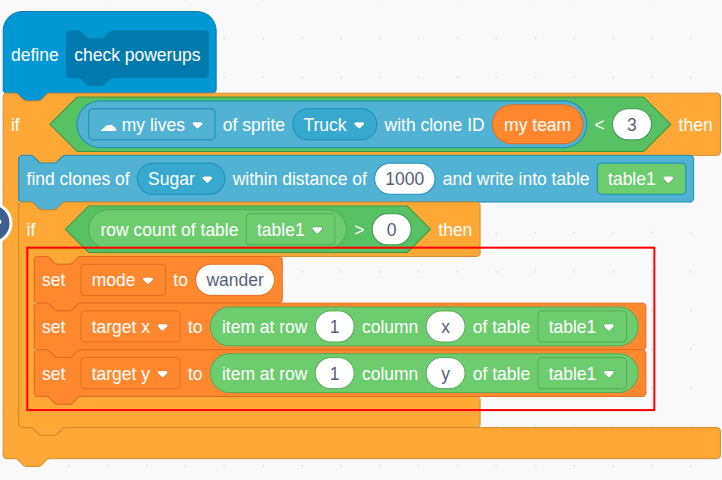
Step 7 - Return from “check powerups”
Once we’ve spotted a Sugar clone and decided to go for it, our job inside the
check powerupsblock is done for this cycle. There’s no need to continue and check for Gas powerups. We can use areturnblock to exit the custom block immediately.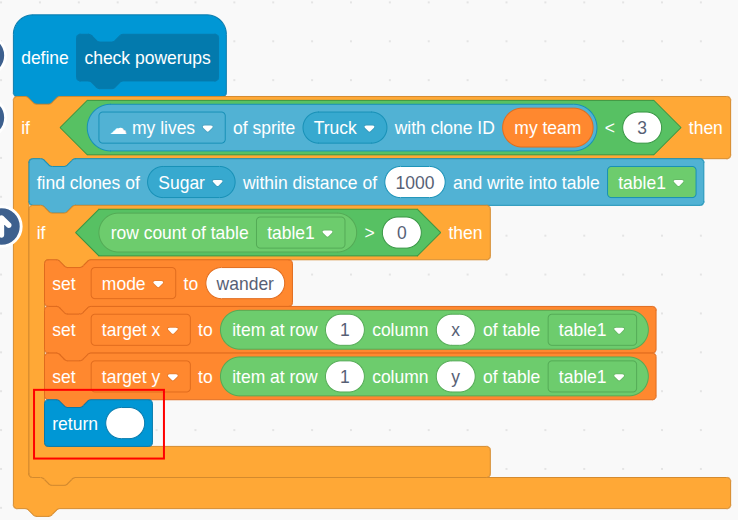
Pro Tip: It’s a common misunderstanding that the
returnblock is only for reporter blocks (the ones that return a value). You can also use it in regular stack blocks like this one to simply stop the block from running any further. Its return value is just ignored. This is equivalent of using thestop [this script]block.
Step 8 - Look for Gas Powerups
If our truck is at full health, or if there were no Sugar powerups to find, the code continues. Now we can check for Gas powerups. But, there’s no point in grabbing a Gas powerup if our speed is already maxed out at 120. So, let’s first check our
☁ my speedvariable.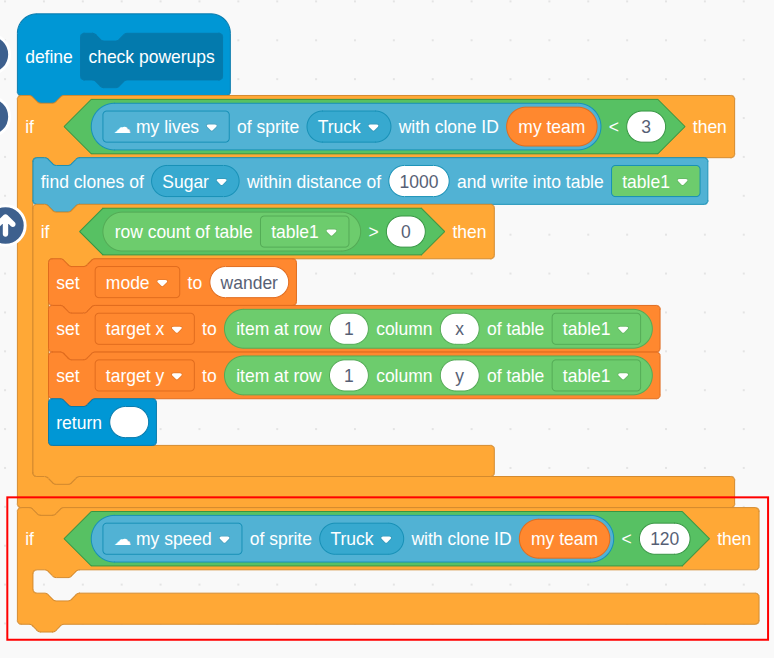
Step 9 - Complete the Rest
The logic for finding and collecting Gas clones is nearly identical to what we just did for Sugar. See if you can build the rest of the code yourself! It’s great practice.
Here is the complete solution for thecheck powerupsblock: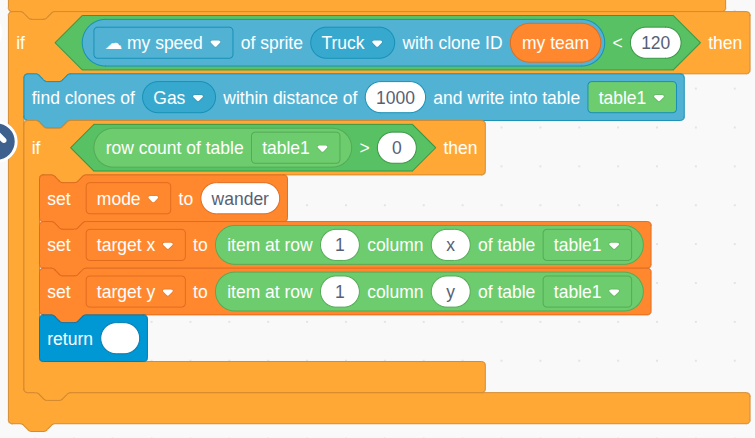
Step 10 - Test This Version
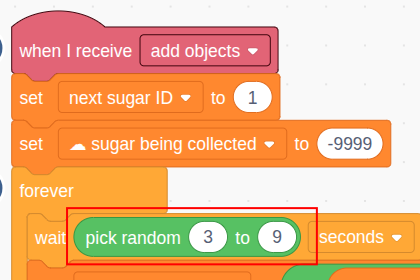
Time to test our new powerup-collecting AI! To focus just on this new skill, let’s keep the
tree countat 0 for now (you can change this in the Setup sprite).It’s also really helpful to make the
table1variable visible on the stage. This way, you can see exactly when the AI finds a powerup.One last tip for faster testing: in the Sugar sprite, you can shorten the time it waits before reappearing. For example, try changing the random wait to between 3 and 9 seconds.
Now you can test your AI by opening the project in two browser tabs and letting them battle. It should look something like this:
Version 5 - Avoiding Trees (Difficulty: 5)
Now for a real challenge: obstacle avoidance! Right now, our truck will just drive straight into trees and get stuck, completely stopping it from chasing the opponent or grabbing powerups. We’re going to fix this by teaching our AI how to detect when a tree is in the way and then plot a “detour” to get around it.
Step 1 - Export Version 4 for Backup
First thing’s first. Let’s make a backup of our working powerup-collecting version. Export your Controller sprite as a file (it will be named something like
sprite3). This way, if anything goes wrong, you can easily import this version and start again.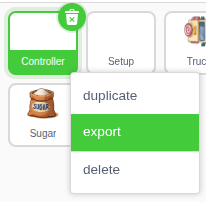
Step 2 - Define a New Reporter Block
To avoid trees, our AI first needs a way to “see” if its path is blocked. We’ll create a new custom block that can answer a simple question: “Is this direction blocked?”. Let’s name it
direction is blocked, and it will take thecommandas an input. Make sure to select “Run without screen refresh” and define it as a reporter block. A reporter block returns a value; ours will return1if the path is blocked and0if it’s clear.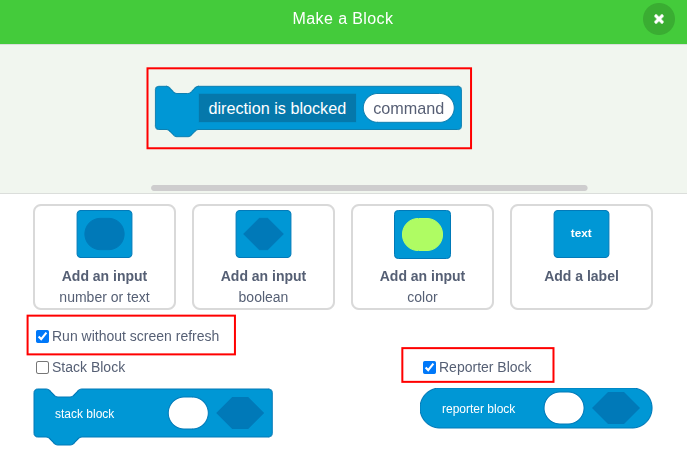
Step 3 - Discussion On How to Detect Tree Obstacles
Before we jump into coding, let’s talk strategy. How can our Controller sprite, which only sends commands, know if the Truck sprite is about to hit a tree?
In standard Scratch, you might try a “ghosting” technique: quickly move the sprite forward, check for a collision, and move it back before the screen refreshes. But that won’t work here, because our Controller sprite and Truck sprite are separate. The Controller can’t directly move the Truck to test for collisions.
So, we need a different, more clever approach:
- We’ll temporarily move our invisible Controller sprite to the exact location of our Truck.
- We’ll point the Controller sprite in the direction we want to move.
- From that position, we’ll use a new sensing block to scan a rectangular “detection area” in front of the sprite to see if any trees are inside it.
Let’s implement this idea in the next few steps.
Step 4 - Move the AI sprite to the Truck
First, let’s get the current X and Y position of our truck using its
my teamclone ID. Then, we’ll use ago to x yblock to instantly move our Controller sprite to that same spot.
Remember, the Controller sprite is invisible, so you won’t see anything change on the stage. The whole point of this move is to establish a starting point for our tree-detection scan.
Step 5 - Face Upward if Command is 1
If the
commandwe’re checking is1(move up), we need to check for trees above the truck. To do this, we’ll point our Controller sprite upwards (direction 0). This step is crucial because the detection area we’re about to create is always relative to the direction the sprite is facing.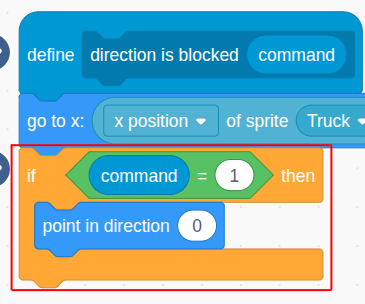
Again, we’re just using the invisible sprite’s direction to set up our detection area.
Step 6 - Handle the Other 3 Directions
Similarly, we’ll handle the other three possible commands (
2for down,3for left, and4for right), pointing the Controller sprite in the corresponding direction each time.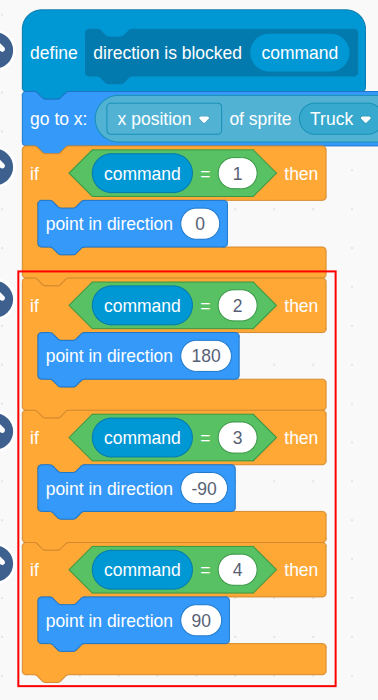
Step 7 - Detect Tree Clones in a Rectangle Area
With our Controller sprite now at the truck’s location and pointing in the direction of intended movement, we’re ready to scan for trees. We’ll use the
find clones of sprite in rectangleblock. Here’s how this powerful block works for our setup: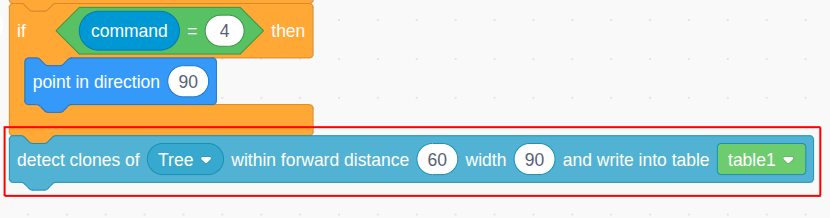
Explanations:- We are looking for visible clones of the Tree sprite. The original Tree sprite is hidden, so this check will correctly ignore it.
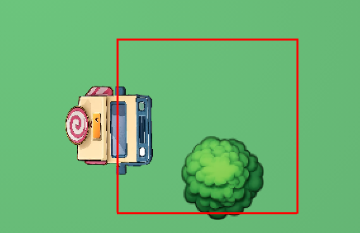
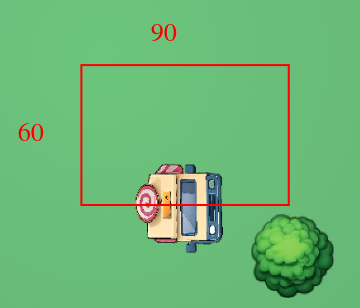
- The rectangle is defined relative to the Controller sprite’s forward direction. So if the
commandis1(up), the Controller is facing upward, and the rectangle will extend 60 units forward and expand 90 units wide, like this:
- We will store information about all clones found in the
table1variable.
Feel free to fine-tune thedistanceandwidthvalues. Think of distance as how far ahead the AI can “see,” and width as its “peripheral vision,” or how wide you want to scan.If the center of any Tree clone is inside this rectangle (i.e. its center point falls into this rectangle), it will be listed in the table, which includes columns for clone ID, x, y, and distance.
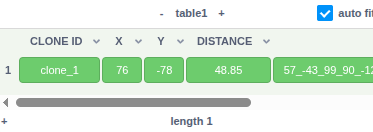
If more than one clone is found, the table will be sorted by distance, with the closest one listed first.
Step 8 - Check If Table is Empty
We don’t need the specific details of the trees, just whether any tree was found. So, we can simply check if
table1has any rows. If the row count is greater than 0, a tree is blocking the path, and our block shouldreturn 1. Otherwise, the path is clear, and it shouldreturn 0.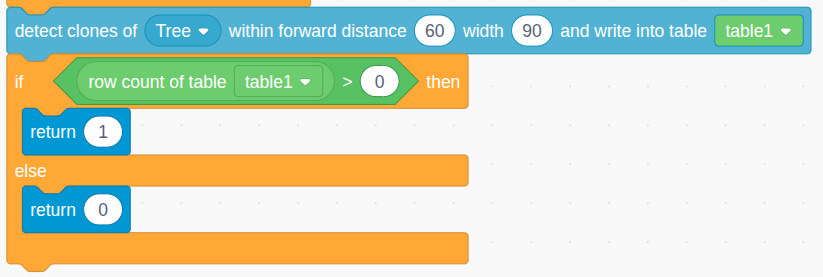
Step 9 - Check if Command Direction is Blocked
Now we can put our new reporter block to use! Back in the main loop, right before we set the
new command, we’ll calldirection is blockedto check the path.Also, to make our AI more responsive and quicker to react to obstacles, let’s reduce the
waittime in the main loop to0.1seconds. This allows it to check for blockages more frequently.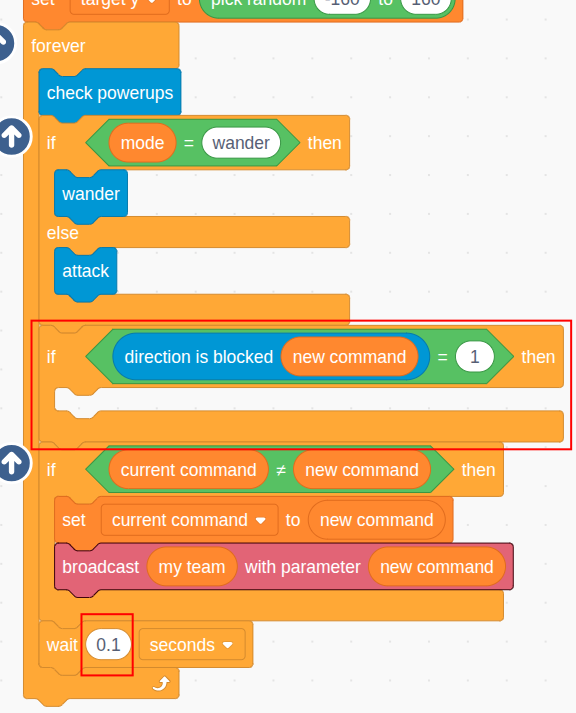
Step 10 - Calculate a Detour Command
If our check finds that the intended direction is blocked, we need to calculate a detour. We’ll create another new custom block,
calculate detour, to handle this logic. This block will figure out a new, unblockeddetour commandwhich will then temporarily override thenew command.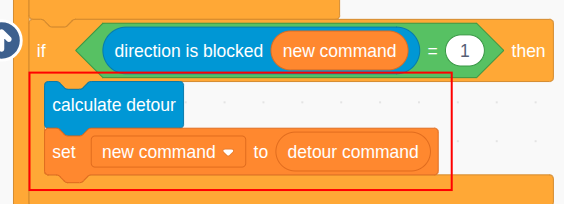
Step 11 - Discussion on How to Make a Detour
So, how do we calculate a smart detour? There are many complex pathfinding algorithms, but we’re looking for a solution that is effective, fast, and simple to build.
Imagine the truck needs to get the Gas on the top right, but a tree is blocking the path to the right.
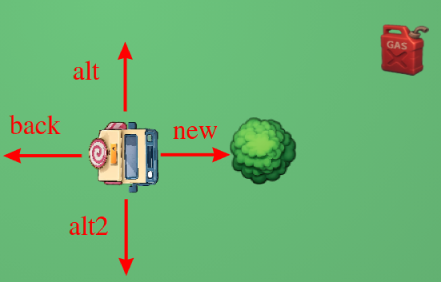
We have a few command options:new command: The original, blocked command (e.g., move right).alt command: The other direction towards the target. Since the Gas is also above the truck, moving up would be a good alternative.alt command 2: The opposite of thealt command. This is a backup plan if thealt commandis also blocked.back command: The opposite of thenew command. If all forward and side paths are blocked, our only choice is to back up to escape the “trap”.
Our strategy will be this: when we’re blocked, we will check these alternatives in order. Once we find a clear path, we’ll execute a two-step detour (e.g., move sideways for 1 second, then move toward the target for 1 second) before returning to our normal logic. This simple strategy will handle most situations very effectively. Let’s build it!
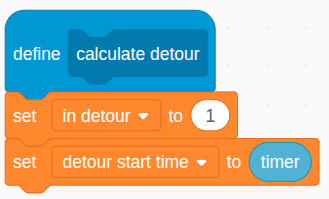
Step 12 - Initialize Detour
Inside our new
calculate detourblock, the first thing we’ll do is set up a couple of variables to manage the detour process:in detour: A “flag” variable. We’ll set this to1to signal that the AI is currently executing a detour.detour start time: We’ll record the currenttimervalue here. This will help us time each step of the detour.
Step 13 - Calculate the Alt Command
Next, we need to determine the best alternative command (
alt command). This command should still move the truck generally closer to its ultimate target.If our original
new commandwas vertical (up/down), thealt commandshould be horizontal (left/right). We can pick the correct horizontal direction by looking atdistance x. Ifdistance xis positive, the target is to the right, so ouralt commandshould be4(move right).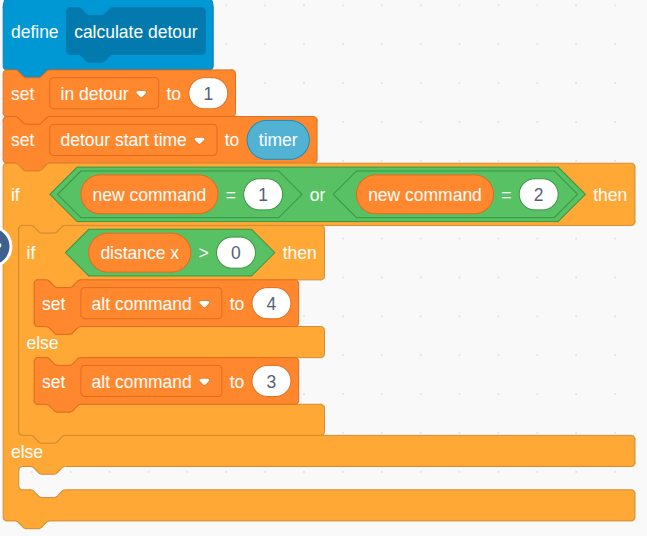
Similarly, if thenew commandwas horizontal (left/right), thealt commandshould be vertical (up/down). We can usedistance yto decide whether to move up or down.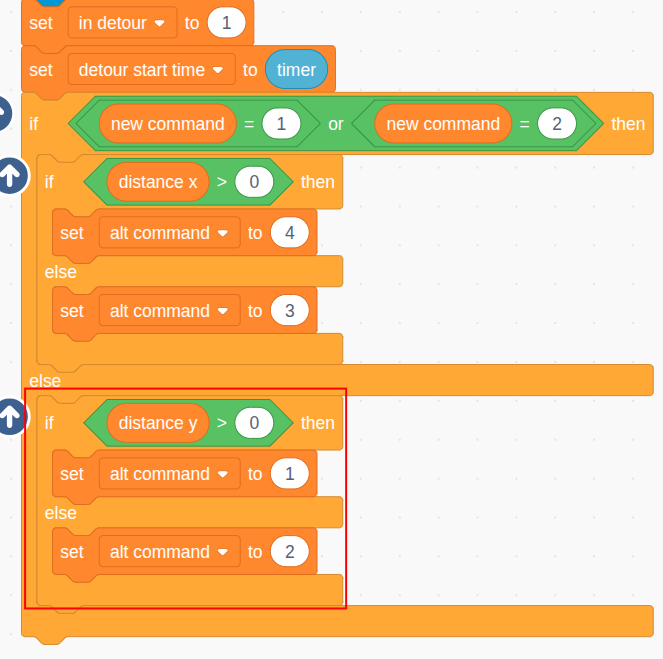
Step 14 - Calculate the Alt Command 2
The
alt command 2is always the opposite of thealt command. We can use a neat little math trick for this: since(left=3) + (right=4) = 7, we can calculate the opposite by subtracting from 7. This logic works whether thenew commandwas vertical or horizontal.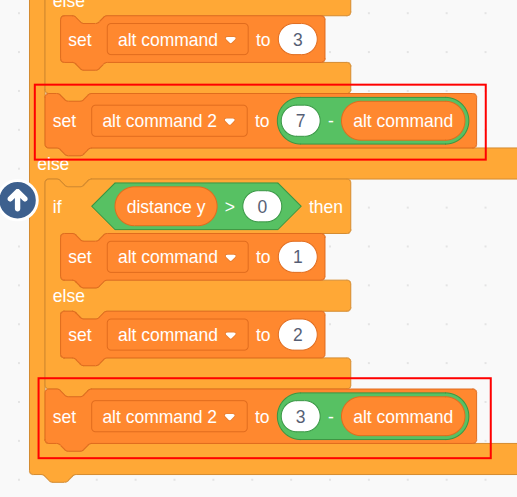
Step 15 - Calculate the Back Command
The
back commandis always the opposite of thenew command. We can use a similar calculation based on whether the command is vertical or horizontal.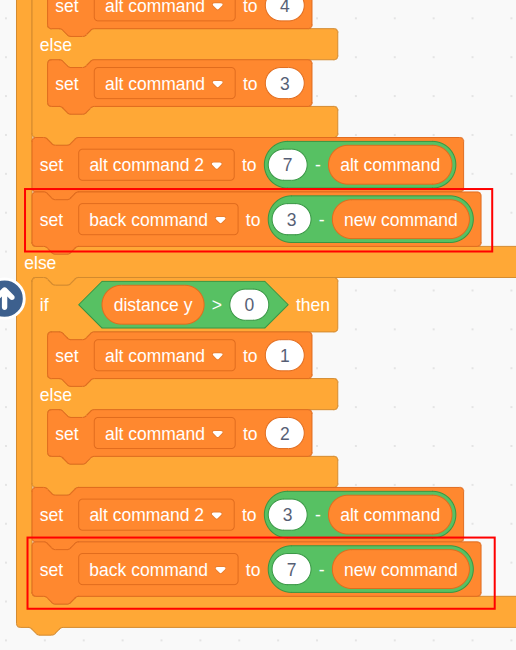
Step 16 - Take the Alt Command If Available
Now we’ll decide which detour path to take. Our first choice is always the
alt command. We use ourdirection is blockedreporter to check if that path is clear. If it is, we’ve found our detour! We’ll set up a two-step plan:detour command: Set to thealt command.detour command 2: Set to the originalnew command.
This means the truck will first move sideways, then try to resume its original path. Since we’ve found a plan, we can use a
returnblock to exit thecalculate detourscript.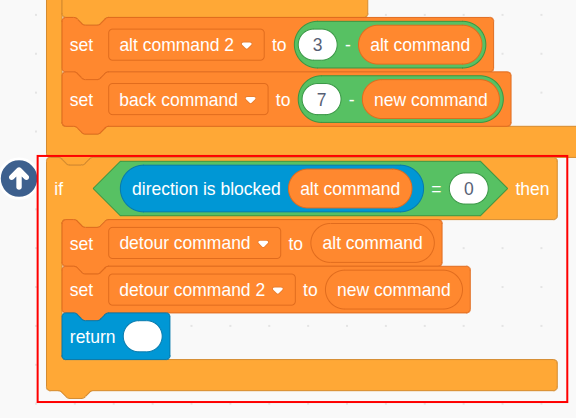
Step 17 - Take the Alt Command 2 If Available
But what if the
alt commandpath is also blocked? This means obstacles are in front of us AND on one side. Our next best option is to tryalt command 2(the other side). If that path is clear, we’ll set our detour plan to usealt command 2first, followed by the originalnew command.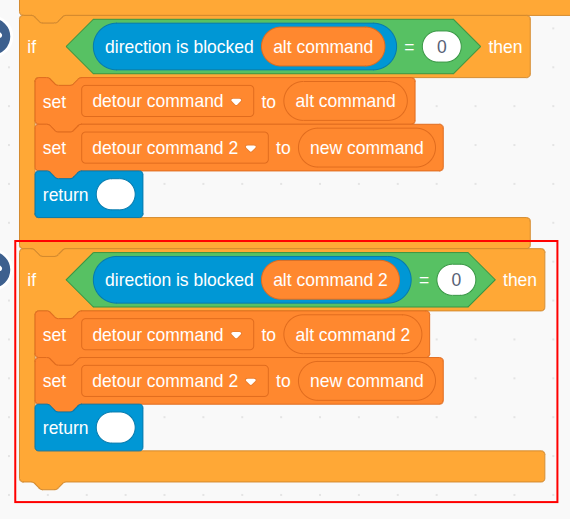
Step 18 - Take the Back Command as a Last Resort
In the worst-case scenario, the paths forward, left, and right are all blocked. The truck is trapped! The only way out is to back up. We’ll set the detour plan to use the
back commandfirst, and then follow it up with thealt commandto try and steer around the trap.
Step 19 - Add a New Branch for Detour
Now we need to modify our main loop to actually execute the detour. When the
in detourflag is set to1, we need to bypass all our normal logic (checking powerups, finding the opponent, etc.). Instead, we will run a separate branch of code dedicated to the detour.The animation below shows how to restructure your main loop with an
if/elseblock based on thein detourvariable. Notice that the block that sends the command to the truck is now outside and after theif/else, so it runs in every situation.
Step 20 - Stop Detour in 2 Seconds
Inside the new “detour” branch of our
if/elseblock, we’ll manage the two-step detour sequence. The whole detour will last for 2 seconds. By default, thenew commandwill be ourdetour command. If thetimershows that 2 seconds have passed since thedetour start time, the detour is over. We’ll set thein detourflag back to0, so that on the next loop, the AI will go back to its normal behavior.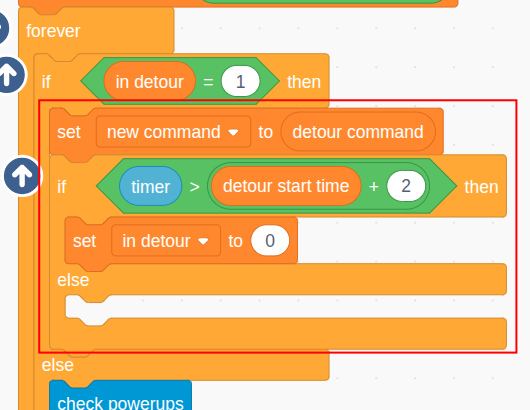
Step 21 - Switch to Second Detour Command in 1 Second
The detour itself has two parts. For the first second, the truck will follow
detour command. After one second has passed, we’ll switch thenew commandtodetour command 2for the second half of the detour. This creates the “go sideways, then go forward” maneuver.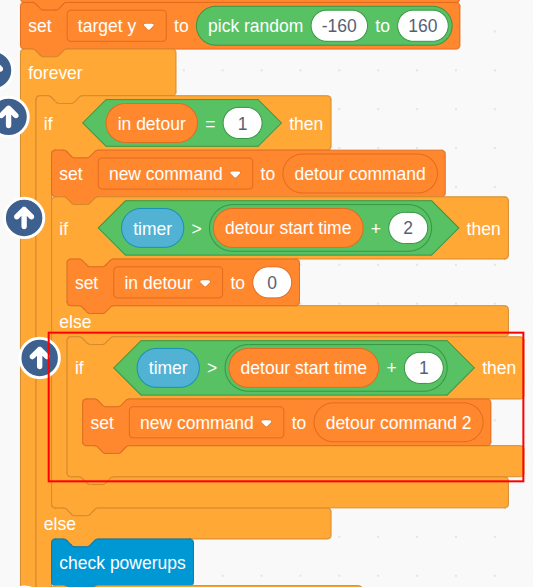
And that’s it! Our detour logic is complete. In short, when the AI “sees” a tree, it will now intelligently try to move sideways or even back up for a moment to get around it.
Step 22 - Test This Version
It’s time for the final test! Go to the Setup sprite and set the
tree countto6(or even more to make it really challenging). Run the project and watch how your AI truck now cleverly navigates around the trees instead of getting stuck. You can also speed up the powerup spawn times again for a more action-packed test.Here is a demo:
Further Improvements
This AI controller is already much smarter, but there’s always room for improvement! If you want to take your AI to the next level and win battles, consider these enhancements:
-
Smarter Attack and Dodge: Have you noticed your truck sometimes has a perfect shot lined up but decides to wander off instead? Improve the
attackmode to recognize when it’s aligned with the opponent, take the shot, and then immediately move sideways to dodge any return fire. -
Strategic Powerup Denial: Right now, your AI only grabs powerups it needs. But what if your opponent is low on health and a Sugar powerup appears? A truly smart AI would grab that powerup just to prevent the opponent from getting it! Modify your
check powerupslogic to consider the opponent’s status, too. -
Don’t Waste Ammo: Firing donuts into a tree is a waste! Before shooting, you can use a similar detection method to the one we built for avoiding trees. Check if the line of sight to the opponent is clear. If it’s blocked by a tree, hold your fire and reposition.
-
Press the Advantage: When your truck is stronger (more lives, more speed), it should be more aggressive! Instead of firing one shot and then wandering away, why not make it stay in
attackmode and keep firing as long as it has the upper hand?
These are just a few ideas to get you started. The best way to improve your AI is to watch it battle. What mistakes does it make? When does it get outsmarted? Every battle is a chance to learn and come up with your own unique strategies to build the ultimate champion -
I CreatiCode pinned this topic on
Hello! It looks like you're interested in this conversation, but you don't have an account yet.
Getting fed up of having to scroll through the same posts each visit? When you register for an account, you'll always come back to exactly where you were before, and choose to be notified of new replies (either via email, or push notification). You'll also be able to save bookmarks and upvote posts to show your appreciation to other community members.
With your input, this post could be even better 💗
Register Login