Game AI for Candy Truck Battle - Part 1 (Difficulty: 3)
-
Introduction
Candy Truck Battle is a 2D online shooting game played between two players. Each player controls a candy-themed truck that can move around, collect power-up items like Sugar and Gas, and fire donuts at the opponent.
Players control the truck using:
- WASD keys to move in 4 directions
- SPACE to shoot donuts
In this tutorial, we’ll build an AI (Artificial Intelligence) that can automatically control the truck in this game. Instead of using the keyboard, the AI will decide when to move and shoot, all by itself.
We’ll go through a series of increasingly powerful AI versions, each adding more intelligence and strategy.
Here’s a preview of what happens when two AIs face off after you complete this tutorial:
Version 1 - Random Walk (Difficulty: 2)
The first version of the AI will do something very simple: send out random movement commands. It won’t think, aim, or chase. It will just wander around randomly, like a monkey pressing buttons.
That might sound silly at first, but it’s actually very useful for two reasons:
-
It helps us set up and test the AI system early, without needing complicated logic. Once we get this working, we can improve it gradually.
-
It serves as a baseline. Any future AI we build should be able to beat this one. If not, the new AI probably isn’t very smart.
Let’s get started.
Step 1 - Remix the Game Project
Go to the following link and remix the original game project to create your own copy:
play.creaticode.com/projects/6858d69beb4683fb2ab03c73
If you’re interested in how this multiplayer game was built, you can read the detailed explanation in this tutorial.
Step 2 - Understand the Manual Controller
The Controller sprite is responsible for handling user input. Let’s take a look at the script that controls movement and shooting:
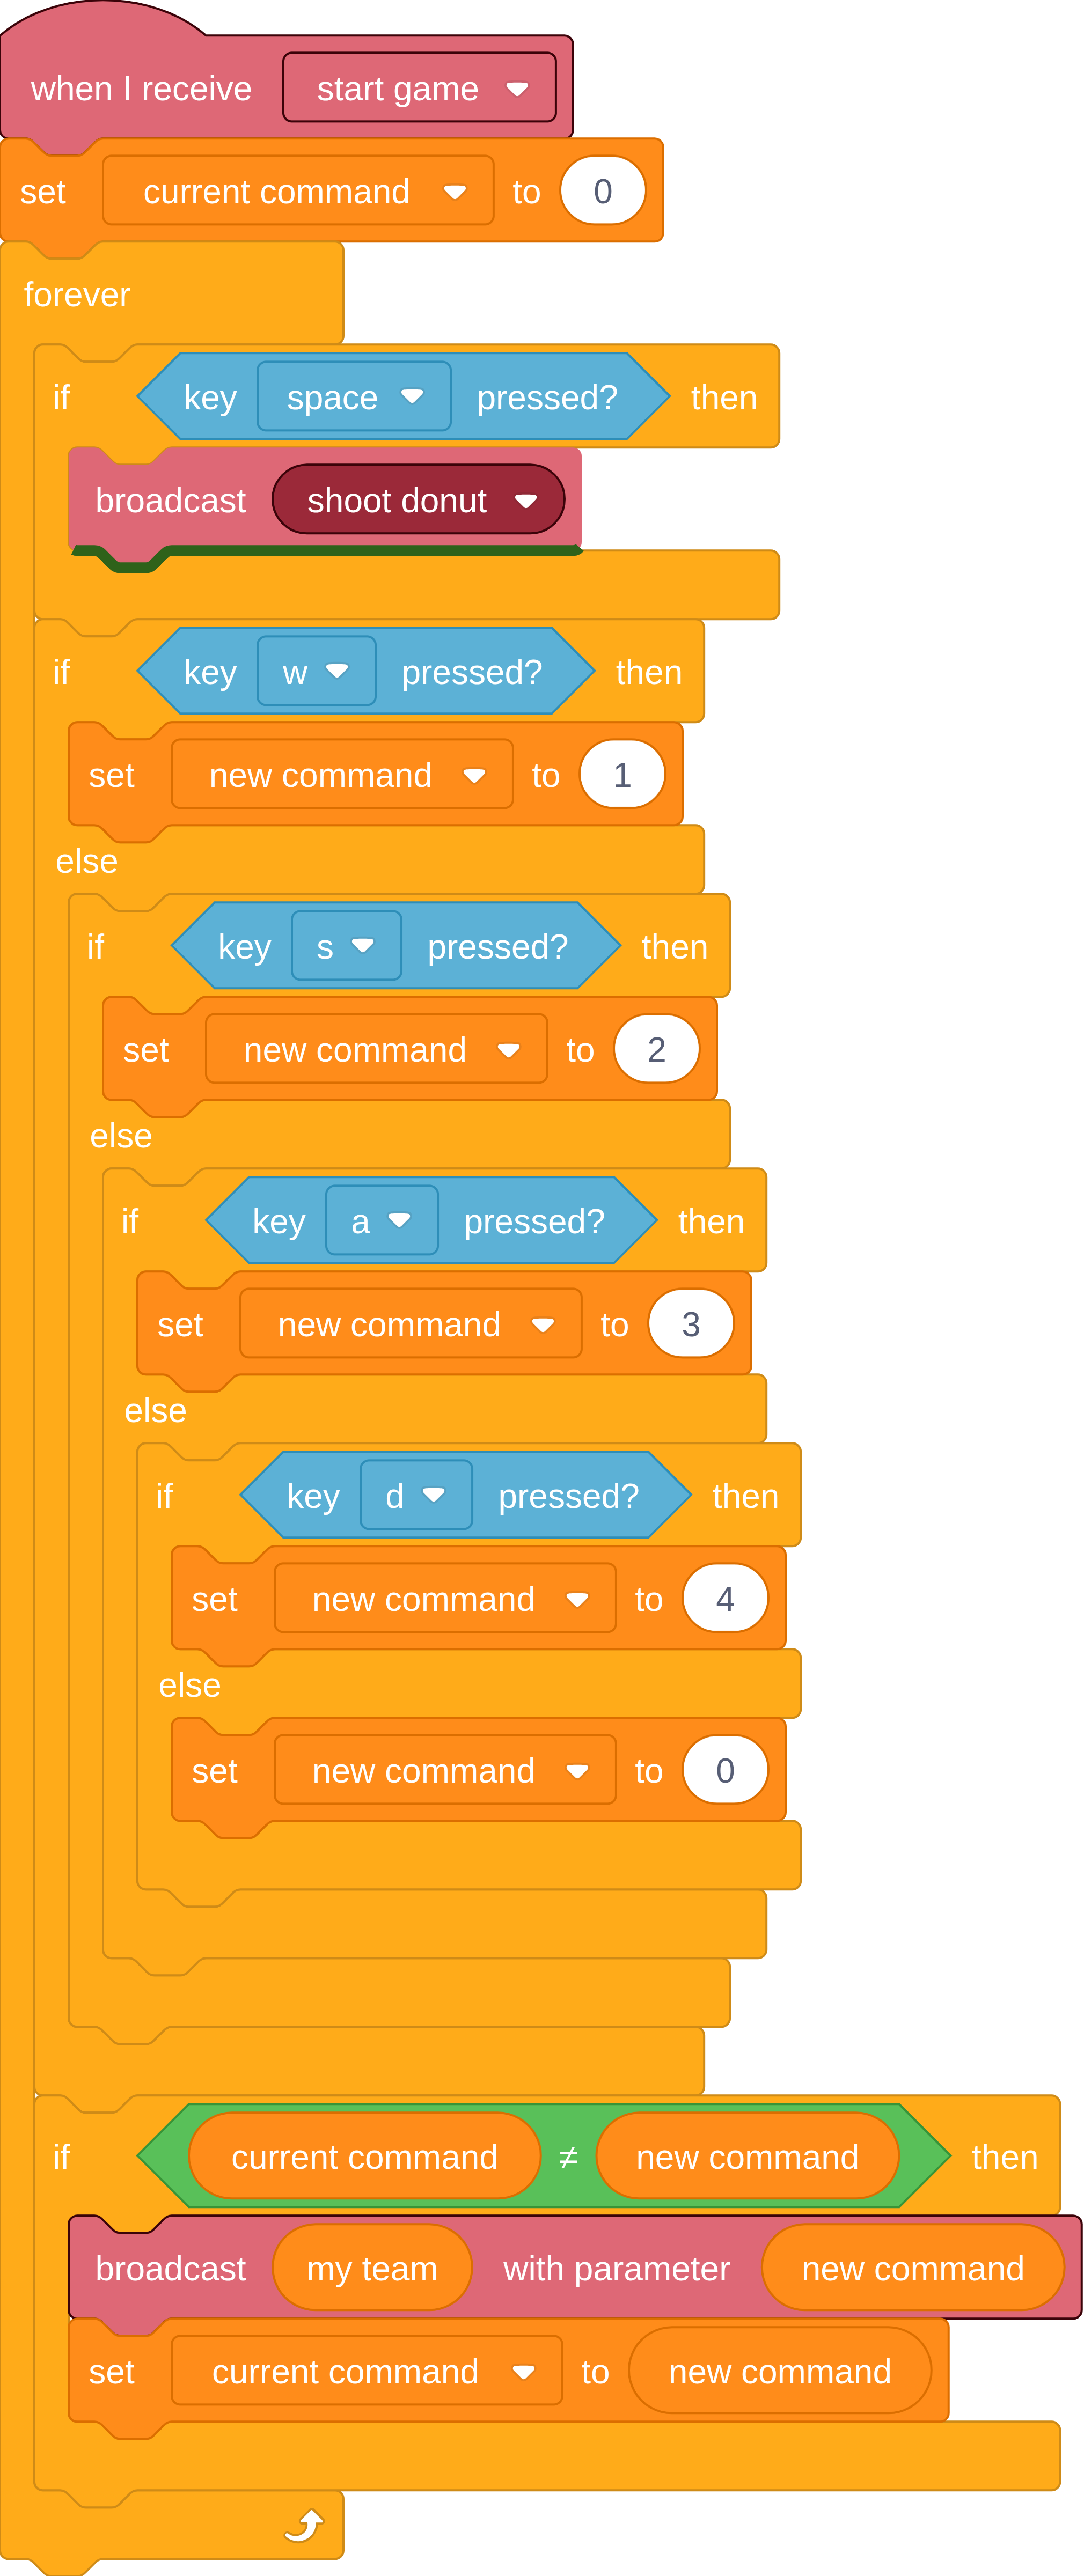
Here’s what the code does:
- It starts running after receiving the
"start game"message. - It enters a forever loop, constantly checking if the player is pressing any movement keys (W/A/S/D).
- If the SPACE key is pressed, it sends out a
"shoot donut"message. - If one of the W/A/S/D keys is pressed, it sends out a movement command using the
"my team"message, with a value of 1–4 (up/down/left/right). - If no key is pressed, it sends command
0(stand still). - It only sends a command when it’s different from the last one, to avoid spamming cloud variable updates.
In summary, our AI needs to:
- Send
"my team"messages with movement commands (0 to 4). - Send
"shoot donut"messages at the right time.
That’s it! Once we can send those messages, we can fully control the truck without touching the keyboard.
Step 3 - Remove the Key Press Related Code
Let’s begin building our AI by reusing the manual controller’s loop, but deleting all the blocks related to key presses.
We end up with this stripped-down version:
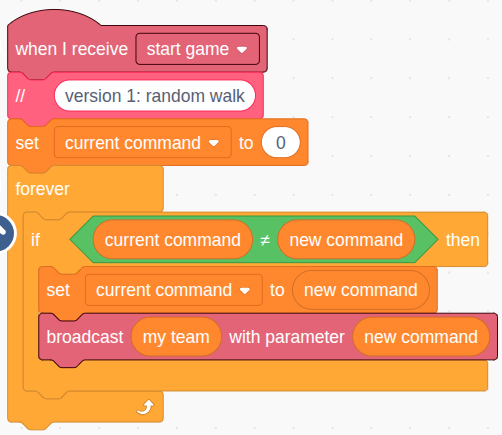
Now we have a basic framework that can send commands. Next, we’ll let it pick commands at random.
Step 4 - Set a random new command
To make the truck move randomly, just pick a number between 0 and 4.
Each number means:- 0 → stand still
- 1 → move up
- 2 → move down
- 3 → move left
- 4 → move right
Use the
pick randomblock like this: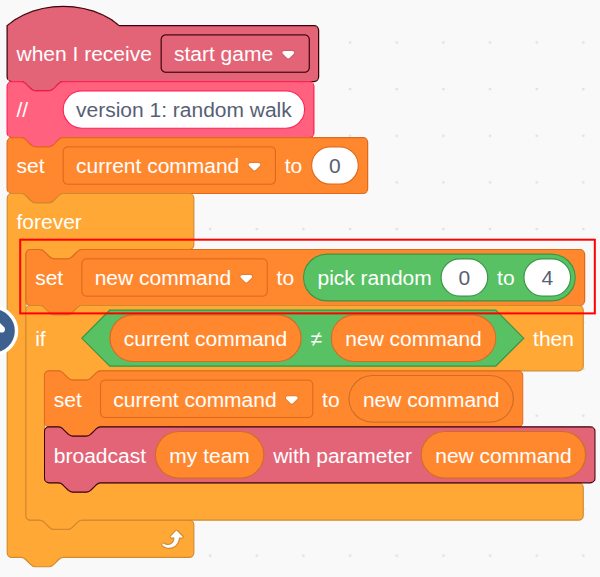
This alone is enough to make the truck wander.
Step 5 - Add a Short Wait
Without a delay, the loop may send hundreds of commands per second, which can overwhelm the cloud server or cause lag.
Let’s slow it down by adding a wait block. One second is a good starting point:
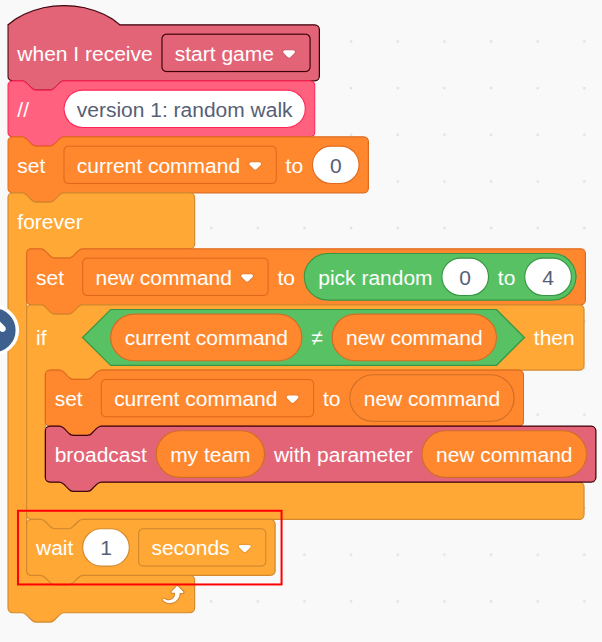
Now the AI will choose a new move every second.
Step 6 - Test the AI By Yourself
Now it’s time to test! You can run two copies of your game in your browser to simulate two AIs playing against each other.
Here’s how:
- Open two browser windows side by side.
- Open your remixed project in both windows.
- In browser A:
- Click the green flag
- Click Create Game
- In browser B:
- Click the green flag
- Click Join Game using the same session ID
- In browser A:
- Click Start Game
Now both trucks will begin moving randomly!
Here’s what that looks like:
This is a working AI. It’s not smart, but it’s alive. And now that you’ve built this, you’re ready to level up and give your truck a brain.
Version 2 - Random Targets (Difficulty: 3)
In the second version of our AI, we’ll give it a bit more purpose: instead of randomly pressing movement buttons, it will now pick a random target location and attempt to move there.
This small change makes the AI appear more intentional, even though it’s still completely blind to rewards, opponents, or obstacles. In future versions, we’ll replace the randomness with smarter decision-making.
Step 1 - Prepare for the new version
We will duplicate the code from Version 1 and modify it.
- Detach the old random command block.
- Keep the basic loop and message-sending logic.
- Remove the block that picks a random number (0–4).
The structure should now look like this:
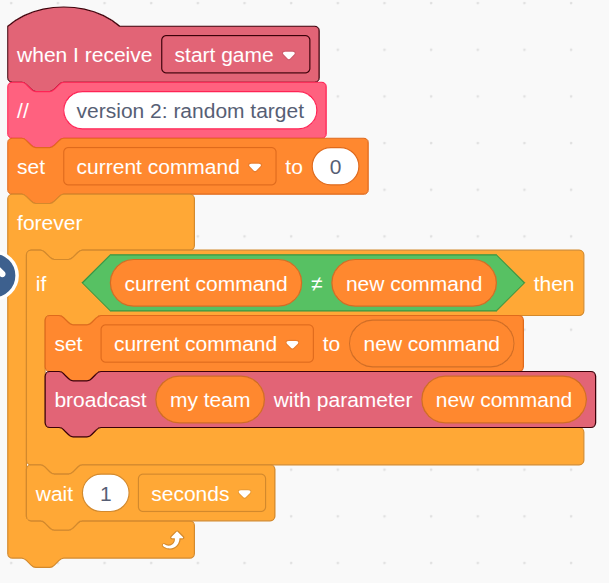
Don’t forget to disconnect the existing code from version 1. Otherwise it will keep sending random commands.
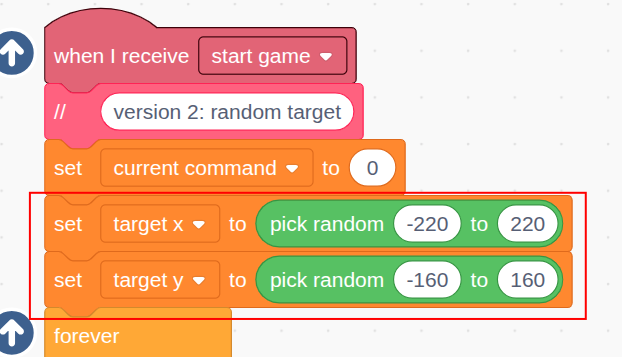
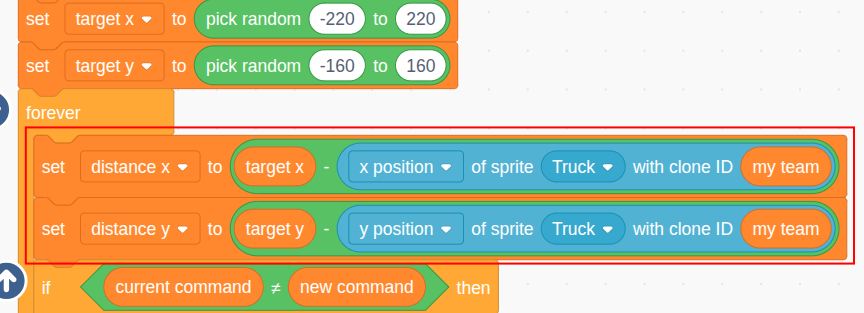
Step 2 - Initialize with a random target location
We’ll choose a random position on the stage as our target. Use two new variables:
target xandtarget y. These should be initialized before the loop starts.Make sure the coordinates are within the stage boundaries:
Step 3 - Calculate X and Y Distances
To move toward the target, the AI needs to compare the truck’s position to the target’s position.
You can use the following sensing block to get the X and Y coordinates of the truck. Make sure to reference the correct clone ID, which matches the player’s
my teamvalue.
At the start of each loop iteration, calculate and store the horizontal and vertical distances:
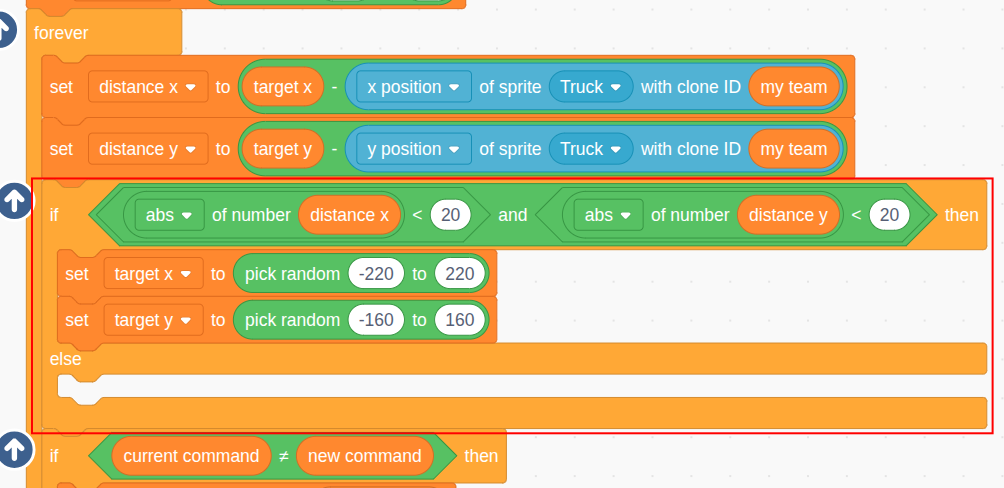
Step 4 - Pick a New Random Target Upon Arrival
If both distances are small (e.g. less than 20), the truck is close enough to its target. In that case, we’ll pick a new random target.
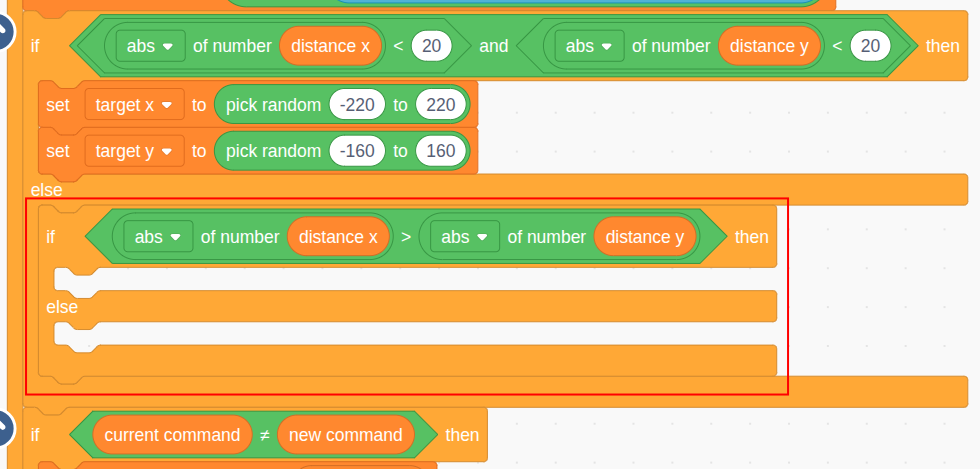
Step 5 - Compare Distance X and Distance Y
To decide whether to move horizontally or vertically, we compare the absolute value of the distances. Whichever is larger becomes the axis we move along.
Step 6 - If Horizontal Distance is Larger
If the distance is wider horizontally, then we move left or right depending on whether the truck is to the left or right of the target.

This version of the AI will go horizontally first in this case.
To decide left or right, check the sign of
distance x: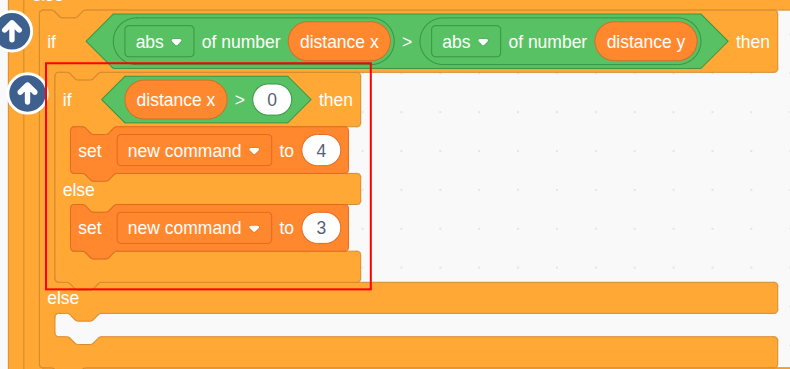
Step 7 - If Horizontal Distance is Smaller
Otherwise, vertical distance is larger, so we’ll go up or down based on the sign of
distance y: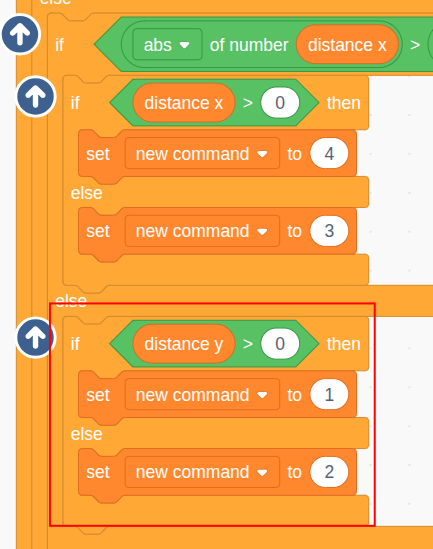
Step 8 - Test with No Trees
To test if our AI is working properly, we will make some adjustments to the project:
Remove Trees
In the Setup sprite, change the tree count to 0. This is because our truck can not avoid trees yet, so it would get stuck at a tree forever.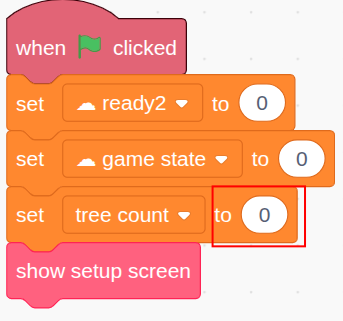
Display variables
Show these 4 variables on top of the stage, so we can check the truck’s movement against these variables:
Now run 2 instances side by side. You’ll see the trucks moving directly toward randomly chosen spots:
Step 9 - Fix the Deadlock Issue
You might notice that sometimes a truck gets stuck at the target, going back and forth near the target point but never switching to a new target.
Here’s what that looks like:
Can you think about what the reason is?
The reason for this issue is the wait time in the loop. Here’s what’s happening:
- Truck is 30 steps from the target → moves forward
- The truck moves 80 steps in one second
- It overshoots → next time it’s 50 steps away, but on the opposite side
- This repeats endlessly
 The Solution:
Lower the wait time. Set the
waitblock to 0.2 seconds or even smaller. This way, the AI updates its movement more frequently, and doesn’t overshoot as easily.
Version 3 - Random Targets or Attacking (Difficulty: 3)
In this third version of our AI, we add the ability to switch between two behaviors:
- Wandering to a random location (as in Version 2);
- Attacking the opponent truck directly.
This change brings the AI to life. It now uses the second message type,
shoot donut, and can actually cause the game to end, unlike before where both trucks wandered forever.
Step 1 - Refactor the Code for Random Target
Start by duplicating the AI code from Version 2.
We’ll extract all the logic related to reaching random targets into a custom block calledwander.This simplifies the main loop to:
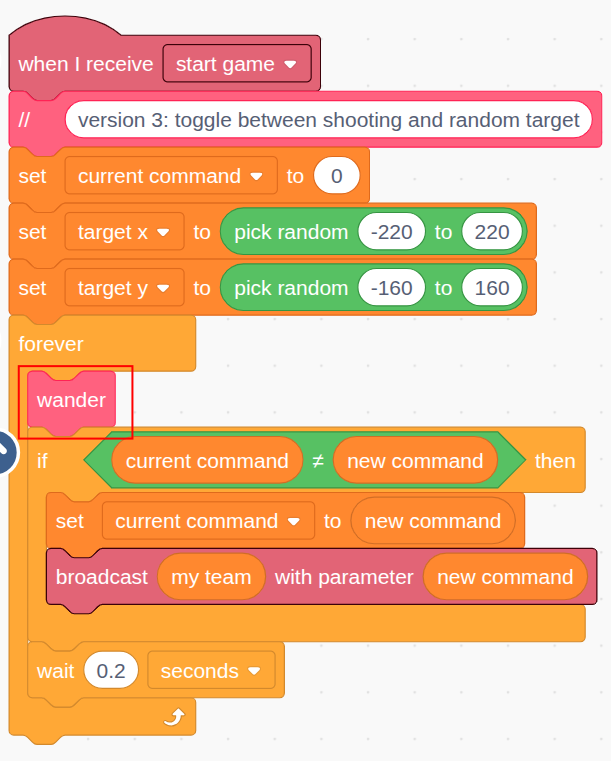
And the
wanderblock contains the logic we moved:
Step 2 - Define the
modeThe AI can now be in one of two modes:
"wander"or"attack". We’ll create a new variablemode, and initialize it to"wander":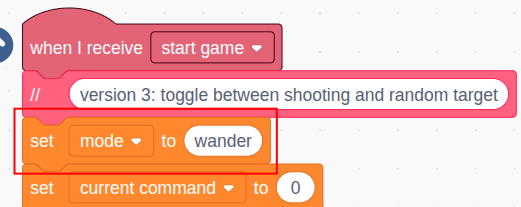
Step 3 - Switch to “attack” mode
Instead of picking a new random target after reaching one, we now switch to
attackmode: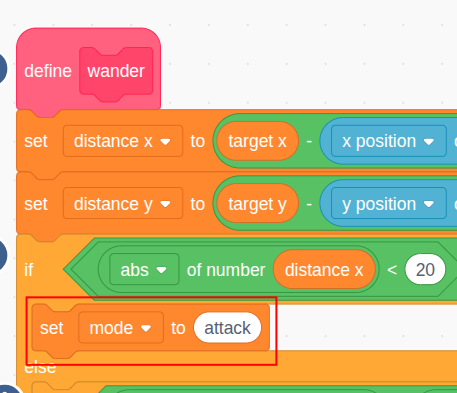
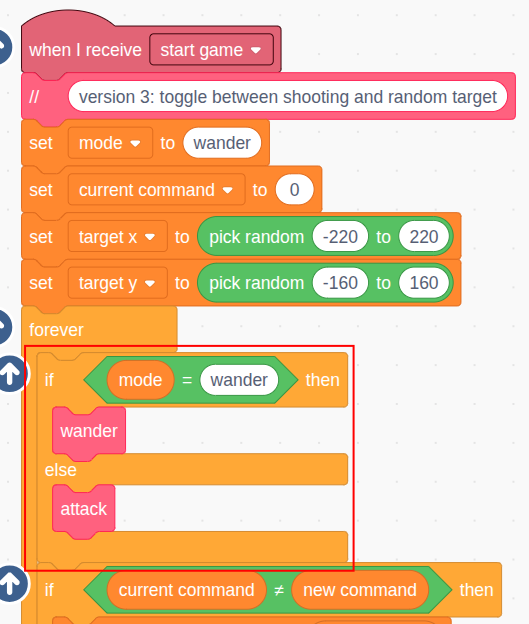
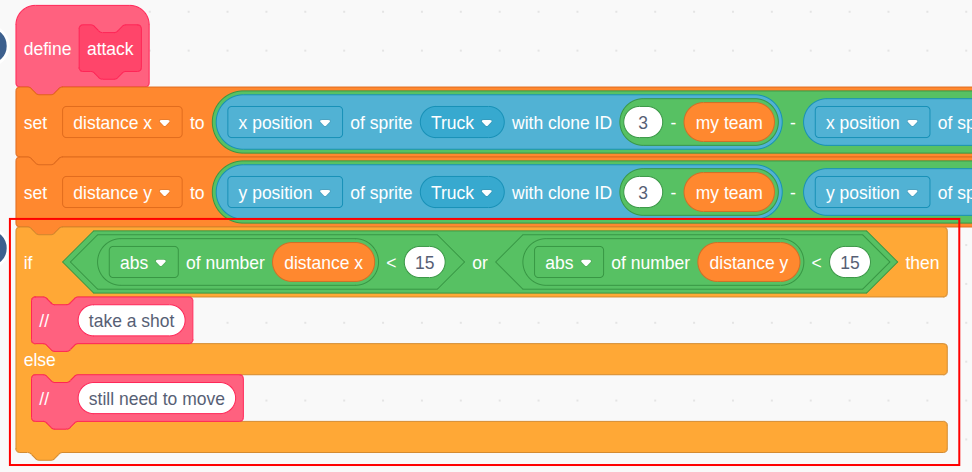
Step 4 - Define the “attack” Block
Define a new block “attack” to contain the logic of attacking the opponent.
Then, in the main loop, we’ll now check the mode before deciding which behavior to run:
Step 5 - Calculate Distance to Opponent
Inside the
attackblock, we calculate the X and Y distance to the opponent truck using clone ID3 - my team: For example, ifmy teamis 1, then the opponent’s ID is 3 - 1 = 2.
Step 6 - Check If We can make a shot
We are ready to shoot if the opponent is aligned horizontally or vertically with our truck (i.e., the distance in the X or Y direction is less than 15):
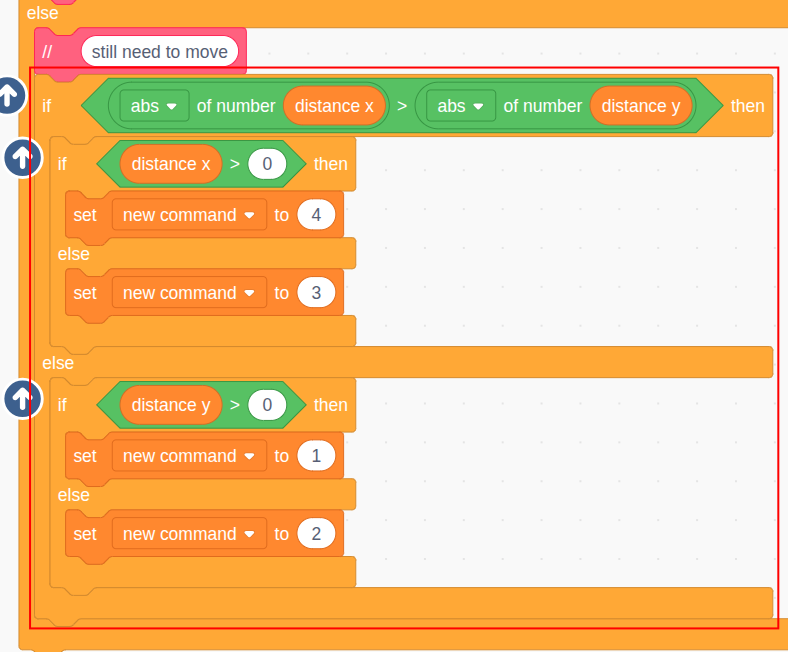
Step 7 - Move to Align with the Opponent
Let’s work on the logic to move to the target first, since we already have code doing similar things.
We can first duplicate the logic from the “wander” block, which looks at whether the vertical or horizontal distance is larger and turns the truck accordingly:
However, we will make one change: when the horizontal distance is larger, we should move our truck vertically, since it is faster to align horizontally to make a shot.For example, in this situation below, we should move the yellow truck down, then fire the shot horizontally:

The code change is very simple. We just need to swap the 2 “if-then-else” blocks: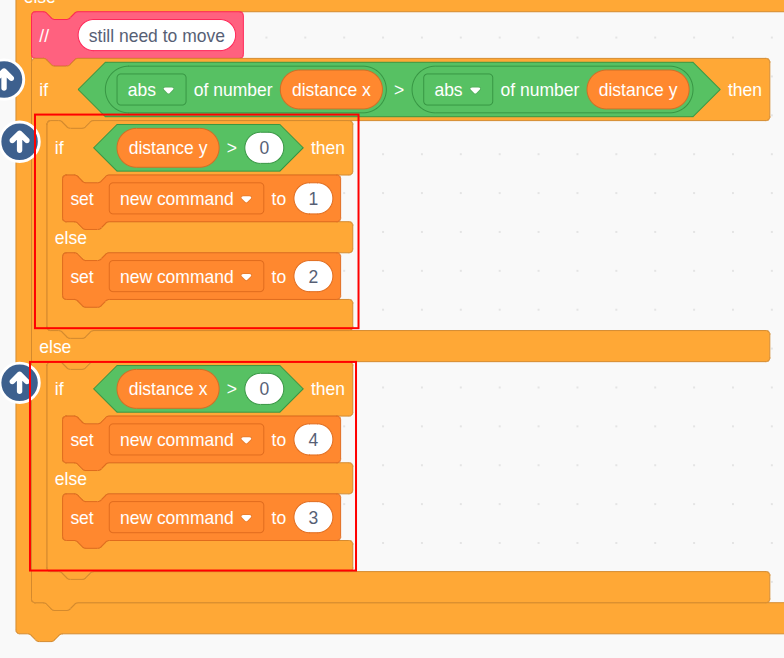
Step 8 - Turn to the Opponent
To shoot at the opponent, we need to first turn our truck towards it. Let’s define a new block
turn to opponent. It turns out this is exactly the same logic we used for moving the truck towards the target position: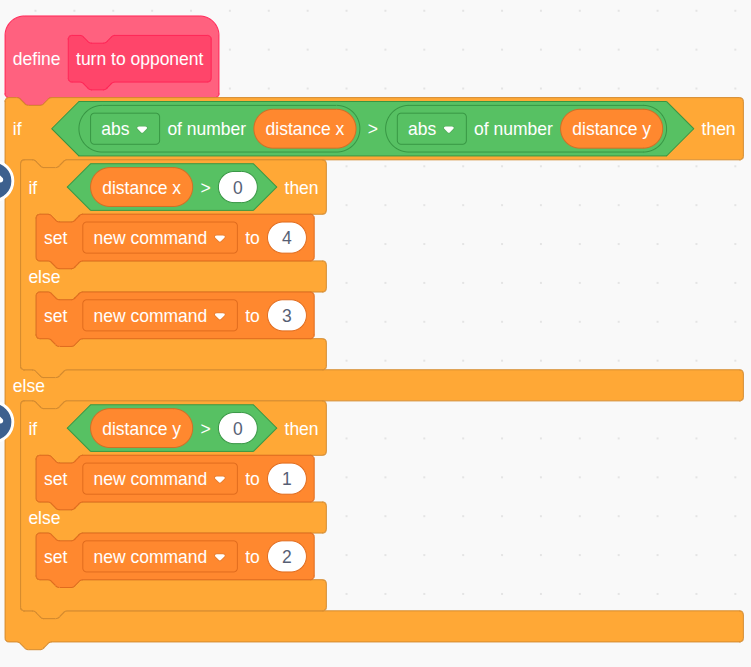
We will use it in the “attack” logic: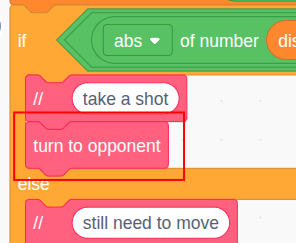
Step 9 - Send out the movement command
The
turn to opponentblock sets the command, but doesn’t send it. So send it now: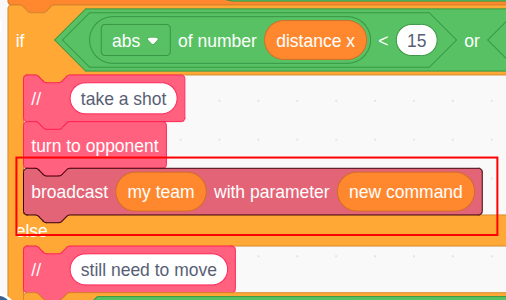
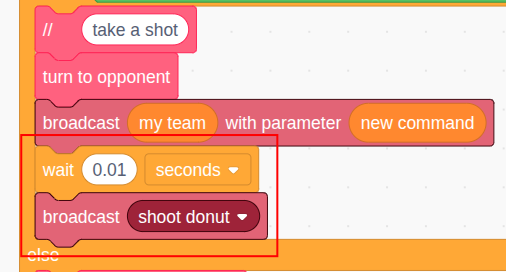
Step 10 - Take a Shot
After turning, wait briefly so the truck finishes its turn, then fire the shot:
Step 11 - Switch back to “wander” mode
After firing, the AI goes back to
wandermode and picks a new random location: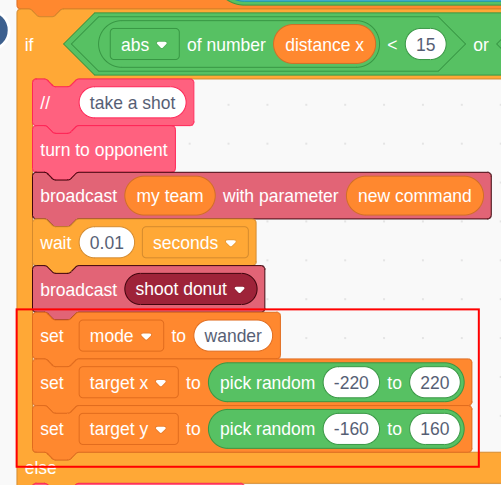
Step 12 - Testing
Keep trees disabled in the Setup sprite.
Show themodevariable on screen to visualize what the AI is doing.Here’s how it looks in action:
Improvements
Version 3 completes the core loop of wander → attack → wander, allowing the game to reach an actual ending. But it’s still a pretty weak AI. Let’s look at a few obvious improvements.
1. Smarter Target SwitchingCurrently, the AI only switches to
attackmode after arriving at a random target. But it may have had a clear shot on the opponent midway through wandering.Fix: Constantly check if it’s aligned with the opponent, even during
wander, and switch toattackinstantly if possible. 2. Dodging After AttackingAfter shooting, the truck just picks a new random target — which might keep it in the line of fire.
Fix: After firing, pick a target that’s not in the same row or column as the opponent.
Or define a third mode:escape, and cycle like this:
wander → attack → escape → wander … 3. Combo FiringOnce the AI aligns with the opponent, it only fires one shot.
But it may be better to fire multiple donuts before wandering off.Fix: Add a cooldown timer and allow burst fire.
These enhancements will make your AI more competitive — especially against another AI using the same version.
In Part 2 of this tutorial, we’ll teach the AI to avoid obstacles and collect power-ups.
-
Pinned by
info-creaticode