
Multi-player 2D game <Candy Truck Battle> - Difficulty 6
-
Introduction
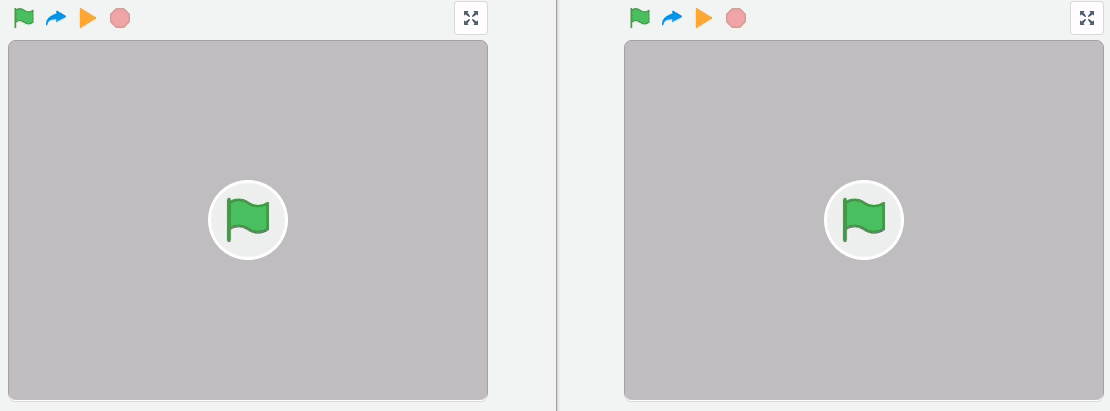
In this tutorial, you’ll build a 2-player game called Candy Truck Battle, where two candy trucks collect rewards and fire donuts at each other. Each player controls one truck on their own computer, but they’ll both see the full game scene on their screens.
To connect the two players across computers, we’ll use the enhanced cloud variables provided by CreatiCode. Here’s a quick preview of the final result:
Module 1 - Setting Up the Game Session
In this section, you’ll set up a game session that connects two players running the same project on different computers. We’ll use widgets for the user interface, and cloud variables for real-time communication between the two players.
Step 1 - Remix the Starter Project
Start by remixing this project:
play.creaticode.com/projects/68543e0c23ae1eb9ca386f59
It contains everything you’ll need: trucks, trees, donuts, rewards, and other assets.
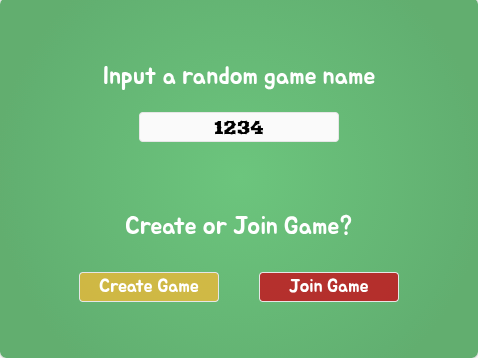
Step 2 - Display the Game Name Input
Open the “Setup” sprite, which manages the connection between two players.
Create a new custom block called
show setup screenand run it when the green flag is clicked: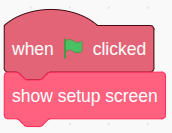
Inside this block, start by displaying a label and an input box:
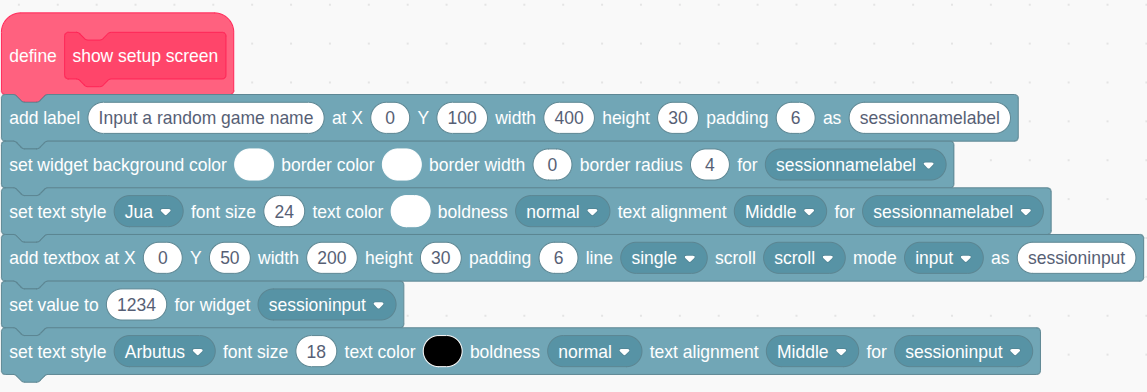
The label has a fully transparent background and 0 border, so we directly see the white text over the green stage. The input box has a default value of 1234 as an example.This game name will be used later as a “session ID” to create a new game session. Each pair of players will share a common session ID, so that the cloud variables will only be kept in sync between them. This way, players in different sessions won’t interfere with each other.
Here’s what it looks like: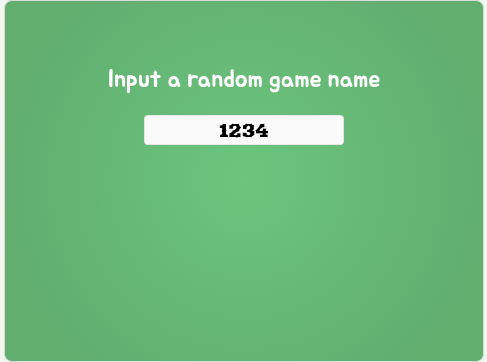
Step 3 - Show 2 Action Buttons
To connect just these two players using cloud variables, one player needs to create the session and the other must join it using the same session ID.
Under the input box, add a label and two buttons:
Here are the blocks you’ll add inside theshow setup screenblock: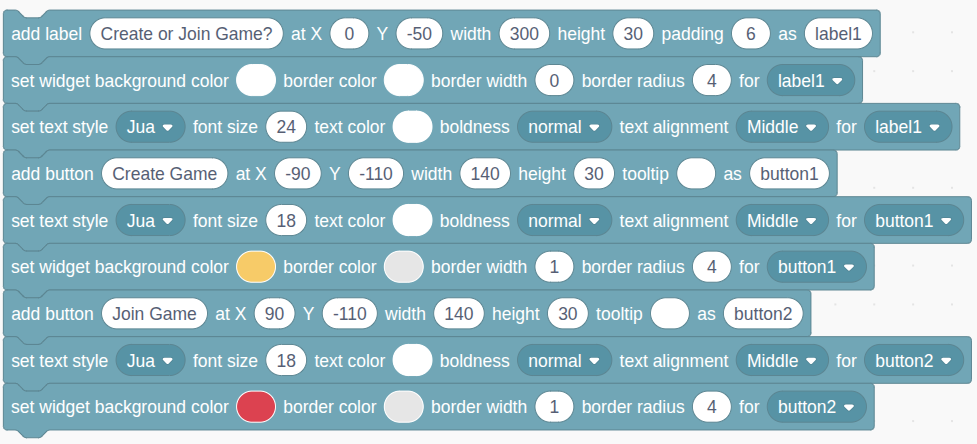
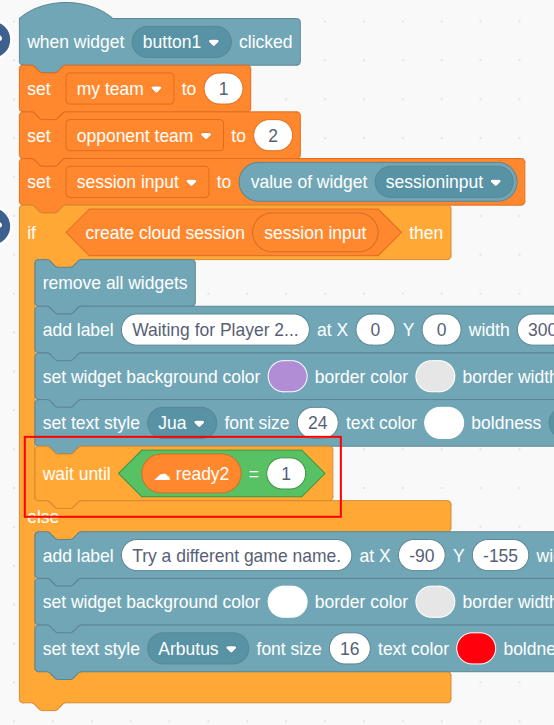
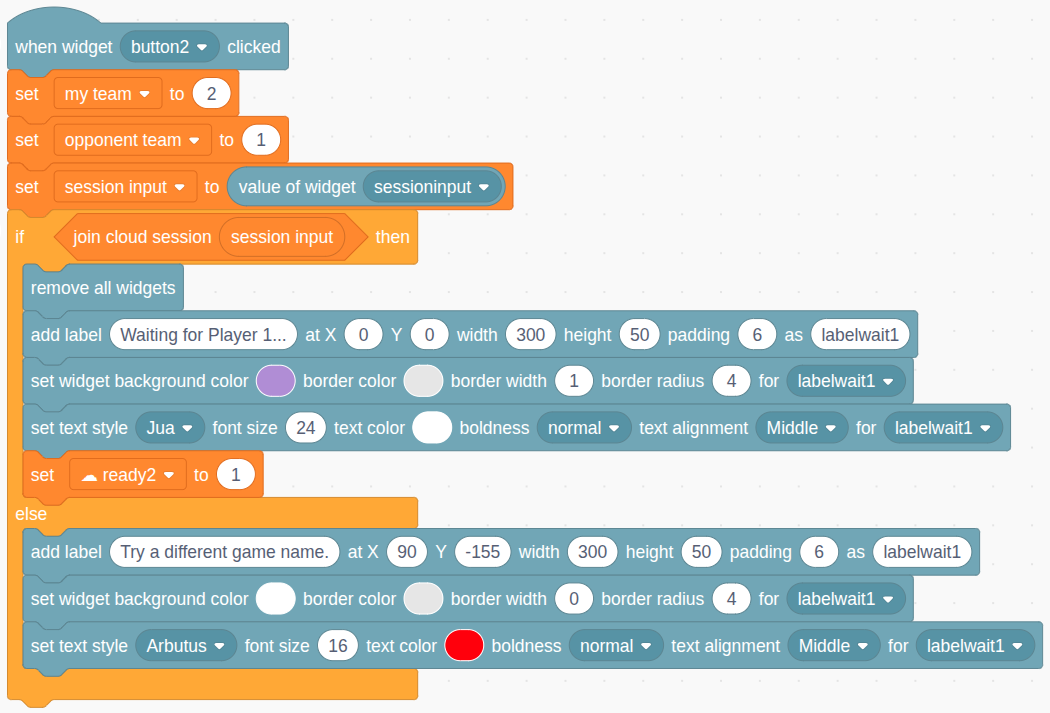
Step 4 - Handle the “Create Session” Button
When the “create session” button (“button1”) is clicked, we will first set a few key variables:

- Player 1 sets
my team = 1andopponent team = 2. - Store the session ID in a variable like
session input.
Step 5 - Create the Session and Handle Errors
Use the
create cloud sessionblock. If it fails (usually because that session ID already exists), show an error and let the player try a different ID.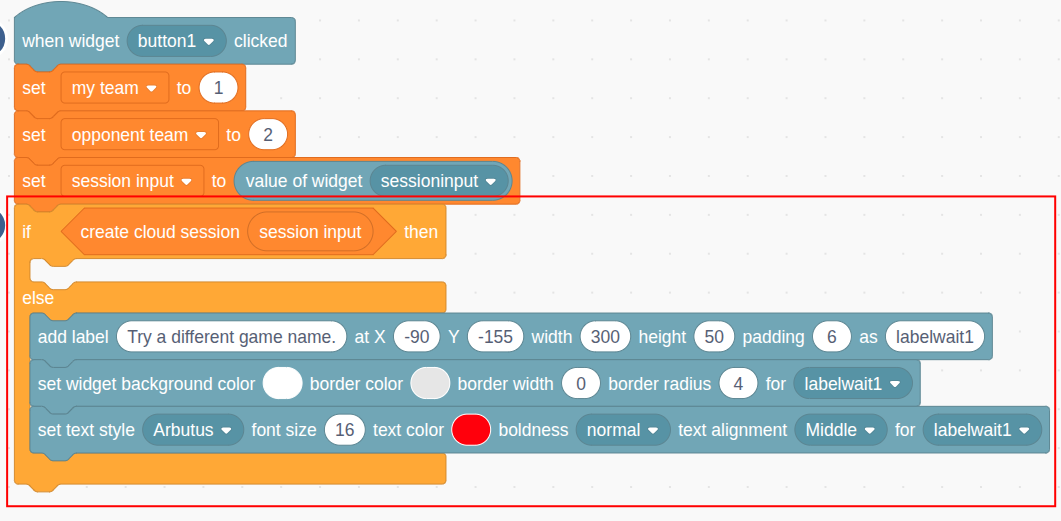
Here’s the error message shown to the user: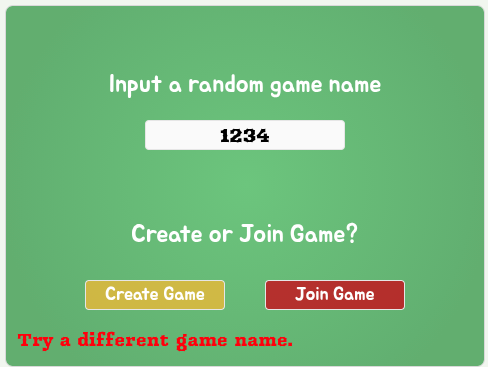
Step 6 - Show a waiting message
If player 1 successfully creates the session, they’ll wait for the second player to join.
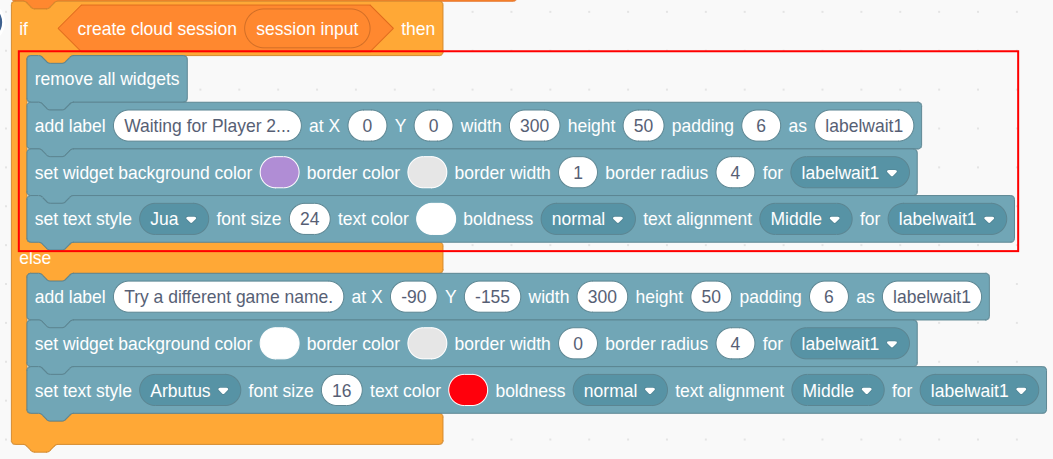
The message looks like this: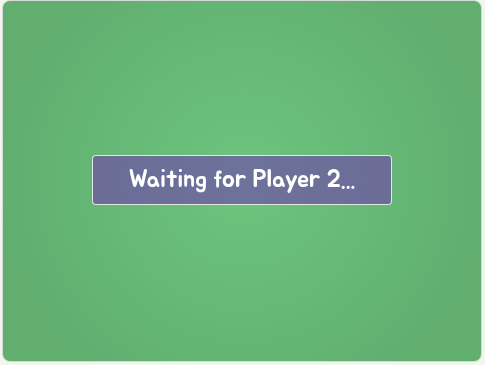
Step 7 - Wait for
☁ ready2from Player 2We’ll use the cloud variable
☁ ready2to let player 1 know when player 2 has joined. Initially, set it to 0.Once player 2 joins, they’ll set
☁ ready2 = 1, and player 1 will detect this change.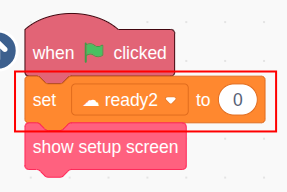
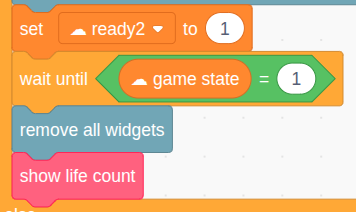
Step 8 - Handle Player 2 Joining the Session
When the second player clicks Button 2 (“Join Session”):
- Set
my team = 2andopponent team = 1 - Save the session ID
- Try to join the existing cloud session
If successful:
- Show a “Waiting for player 1…” message
- Set
☁ ready2 = 1(this triggers player 1’s next step)
If it fails, player 2 probably used the wrong ID or the session isn’t created yet.
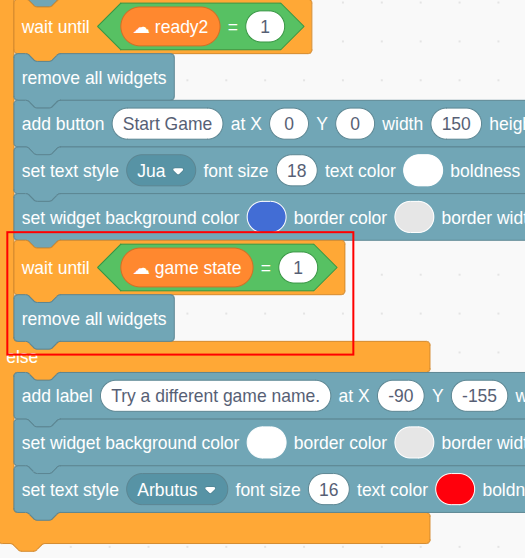
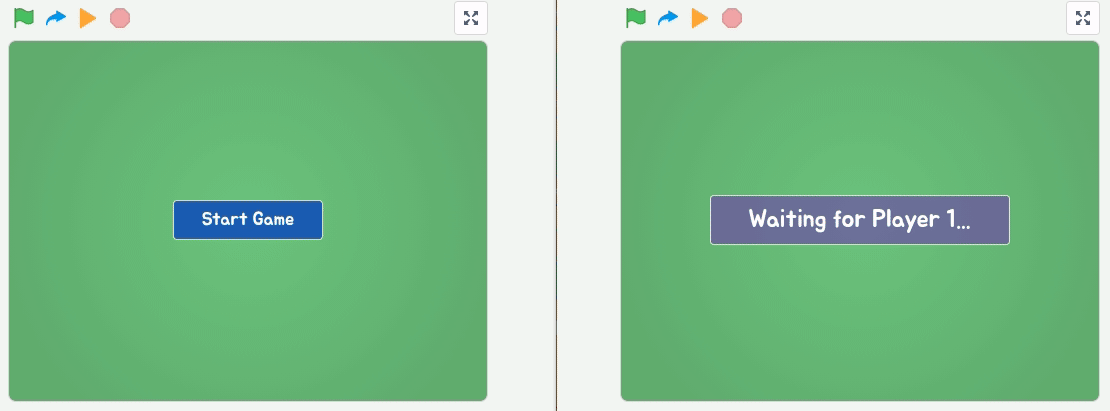
Step 9 - Show “Start Game” Button for Player 1
Once
☁ ready2 = 1is detected on player 1’s side, we hide the setup screen and show a new “Start Game” button.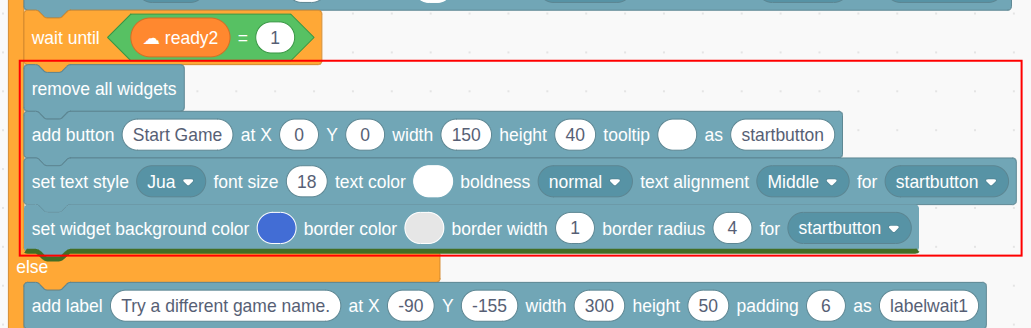
Step 10 - Start the Game
When player 1 clicks “Start Game,” set the cloud variable
☁ game state = 1to let both players know the game has started.Start with
☁ game state = 0when the project loads: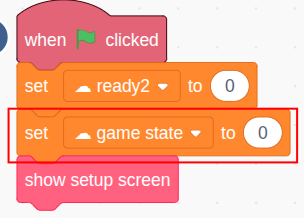
Then update it when the button is clicked: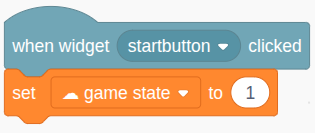
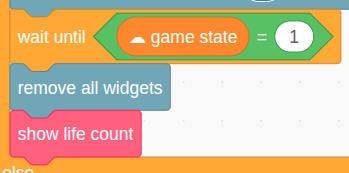
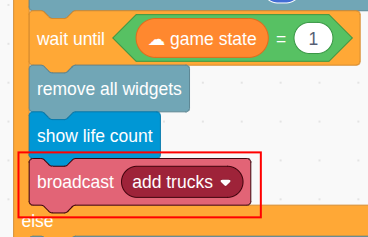
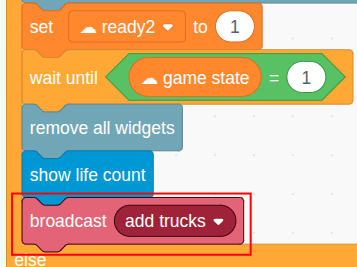
Step 11 - Wait for
☁ game state= 1Once
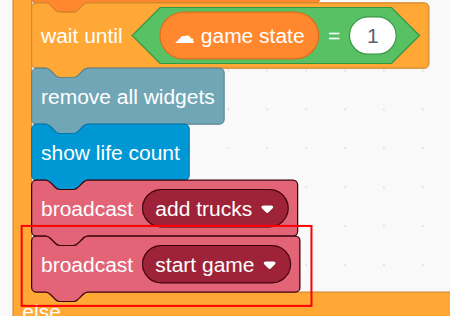
☁ game state = 1, both players proceed.For player 1:
And for player 2: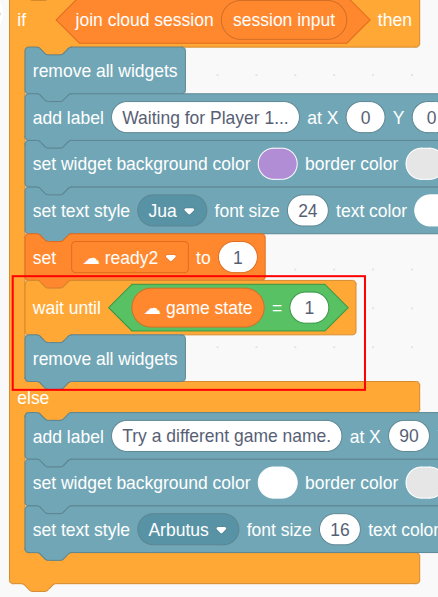
Step 12 - Show Life Count
After the game begins, show each player’s life count, starting at 3. Create a block called
show life count:
- Use
lives_1andlives_2as label names for updates.
Call this block for both players:
Step 13 - Recap
Let’s walk through the full connection process:
- Player 1 enters a unique session ID (like “1234”) and creates a cloud session. They wait for
☁ ready2 = 1. - Player 2 uses the same session ID to join. If successful, they set
☁ ready2 = 1and wait for the game to start. - When player 1 sees
☁ ready2 = 1, they get a “Start Game” button. Clicking it sets☁ game state = 1. - When both players see
☁ game state = 1, they clear the setup screen and display lives.
To test the setup on one computer:
- Save and share the project.
- Open a new incognito window, log in to creaticode.com, and open the project link.
- Arrange the two windows side by side.
Or test with a friend on a different device.
Here is what it looks like on 2 browsers: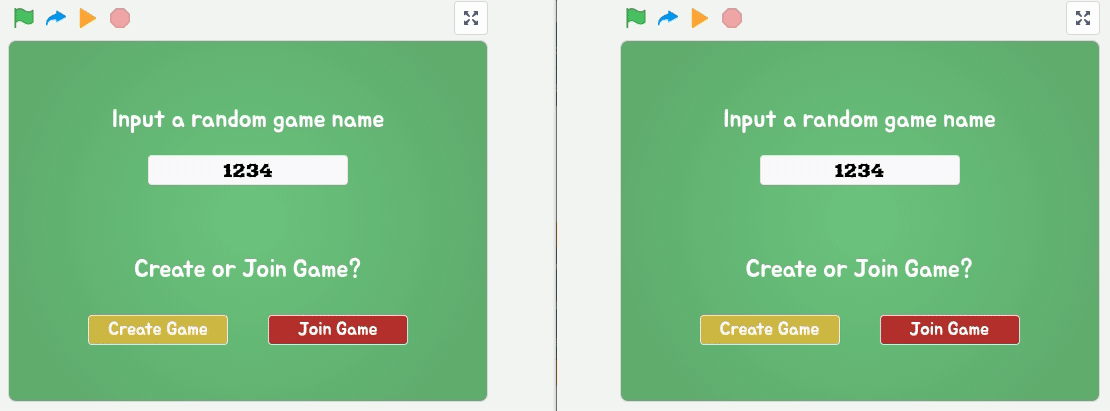
Module 2 - Adding Game Objects
In this module, we’ll add the main objects to the game scene, starting with the trucks and trees. To keep both players’ views identical, we’ll rely on cloud variables to make sure these objects are created in exactly the same way on both computers.
Step 1 - Broadcast the “add trucks” message
After the life count is displayed on both computers, we broadcast a message called “add trucks”:
Step 2 - Create Truck Clones
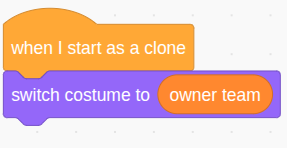
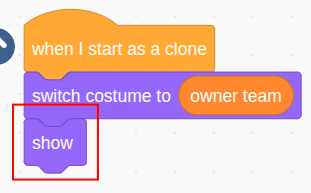
Switch to the Truck sprite.Since we only use clones for gameplay, hide the original sprite when the green flag is clicked. When the sprite receives the
"add trucks"message, it will create two clones, one for each player: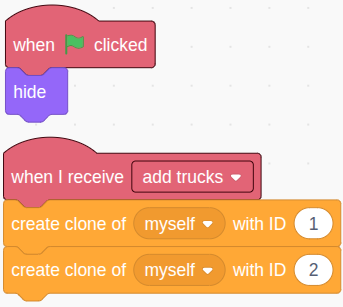
Each clone has a unique clone ID:1represents Player 1’s truck2represents Player 2’s truck
In total, there are 4 clones running across both computers: each player controls their own truck locally, and the other player sees a “mirror” clone of that truck on their computer.
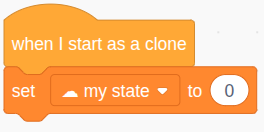
Step 3 - Initialize the Truck Clone State
Every truck clone will start with a
☁ my statevariable with a value of0. This value indicates which direction the truck is moving:0: Not moving1: Moving up2: Moving down3: Moving left4: Moving right
Note that the☁ my statevariable is a cloud variable, and each truck clone has its own☁ my statevariable. The value of this variable is synchronized between the 2 clones with the same ID on the 2 computers. For example:If Player 1 sets clone 1’s state to
3on their computer, the state of clone 1’s mirror on Player 2’s computer is also updated to3, so the clone 1 truck will start moving left on both computers. Meanwhile, clone 2’s state is unaffected.
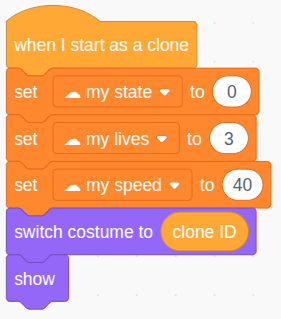
Step 4 - Additional Truck Initialization
Each truck clone should also be initialized with:
- A life count of
3 - A speed of
40(feel free to change the speed) - A costume based on its ID (
1for yellow,2for red) - And it should be shown, since the original Truck sprite stays hidden
Step 5 - Set Starting Positions
Now place the two truck clones in opposite corners:
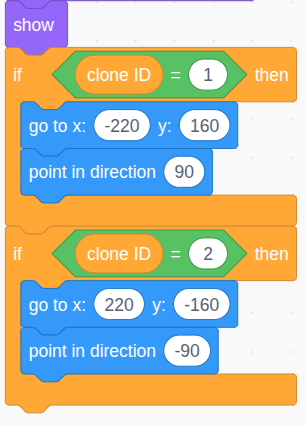
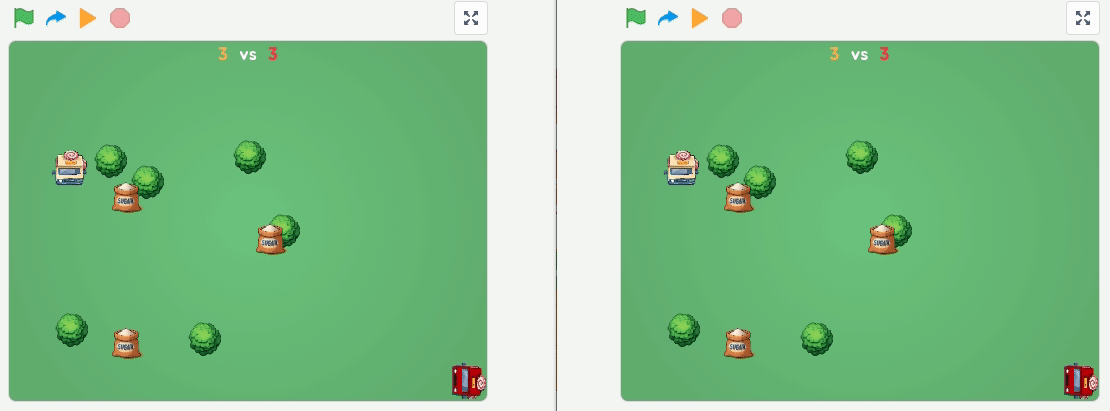
After running the project, you’ll see the two trucks appear like this: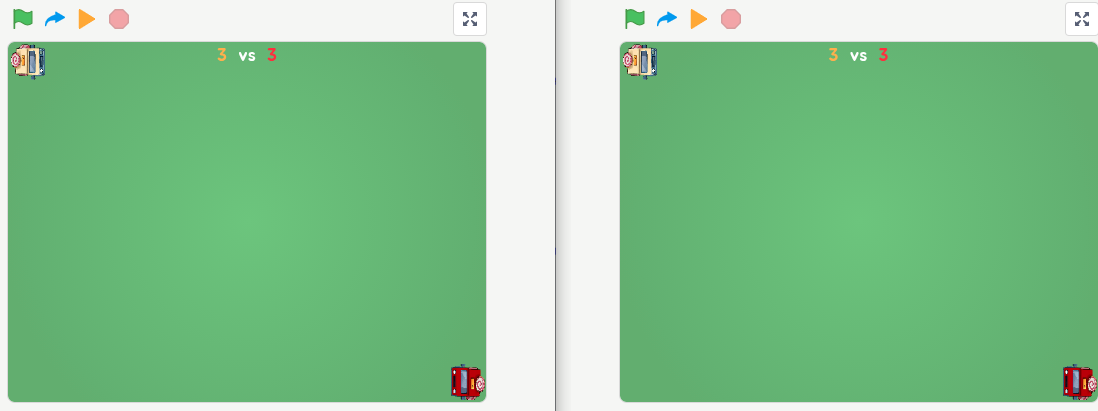
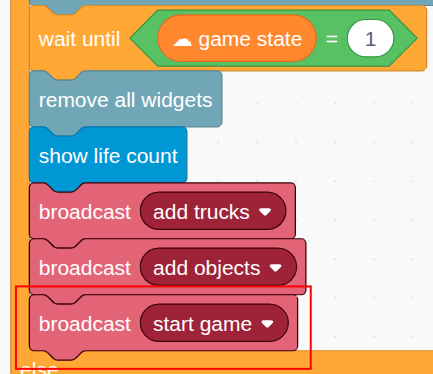
Step 6 - Broadcast the “add objects” message from “Setup”
Back in the Setup sprite, after the trucks are added (on Player 1’s computer only), we send the
"add objects"broadcast: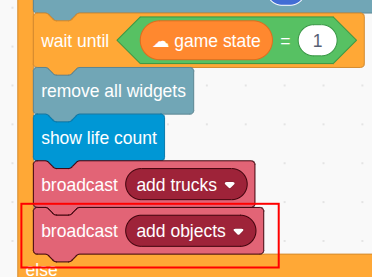
Only Player 1 sends this message. Player 1’s program will decide when and where to add the objects, and then share those details with Player 2 using cloud variables.
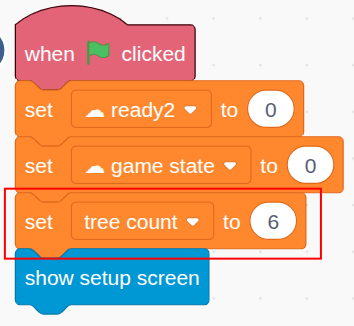
Step 7 - Configure the Tree Count
Trees are static obstacles that block both trucks and the donuts they shoot. Use the variable
tree countto define how many trees to add.Set this value in the Setup sprite:
Then, in the Tree sprite, when it receives the"add objects"message, it checks iftree count > 0:
Again, this part of the code runs only on Player 1’s computer after the “Start Game” button is clicked.
Step 8 - Generate a Tree List
To ensure trees appear in the same places for both players, we generate their positions on Player 1’s computer, then share them using a cloud variable.
We use the format
"x_y"for each position. A list of 2 tree positions might look like:120_-23_100_70Here’s how to build that list step by step:
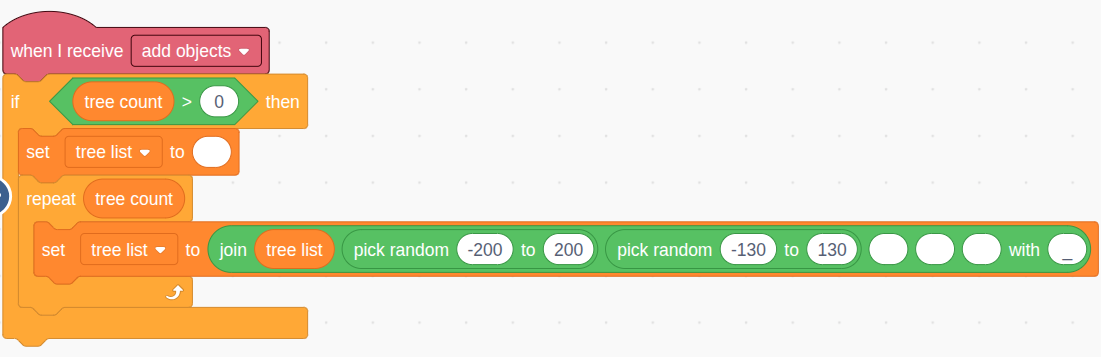
Thetree listvariable starts as empty, and then we repeatedly append a random x position and a random y position to it, all using the “_” separator.
Step 9 - Share the List Using
☁ all treesOnce Player 1 has the full list, assign it to the cloud variable
☁ all trees.
Then both computers will extract the same data and generate trees accordingly: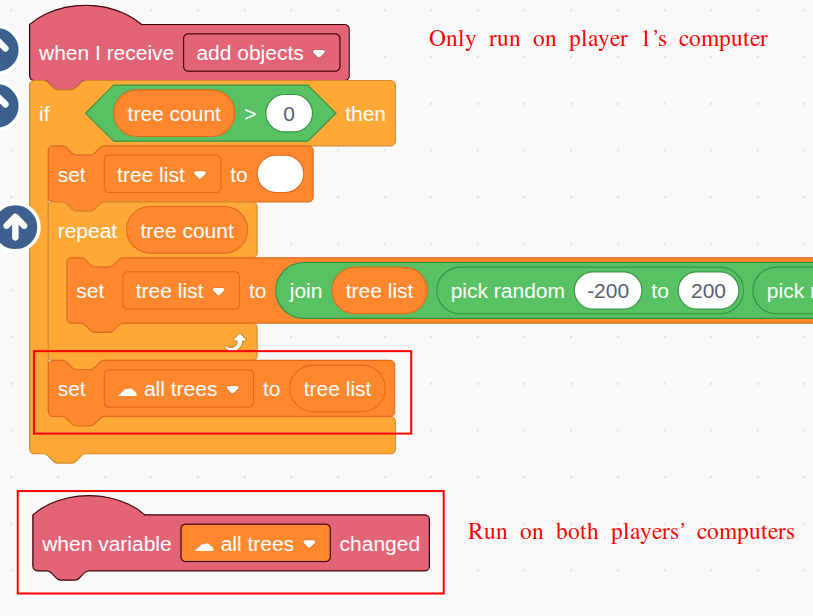
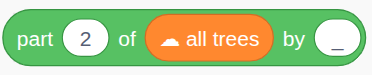
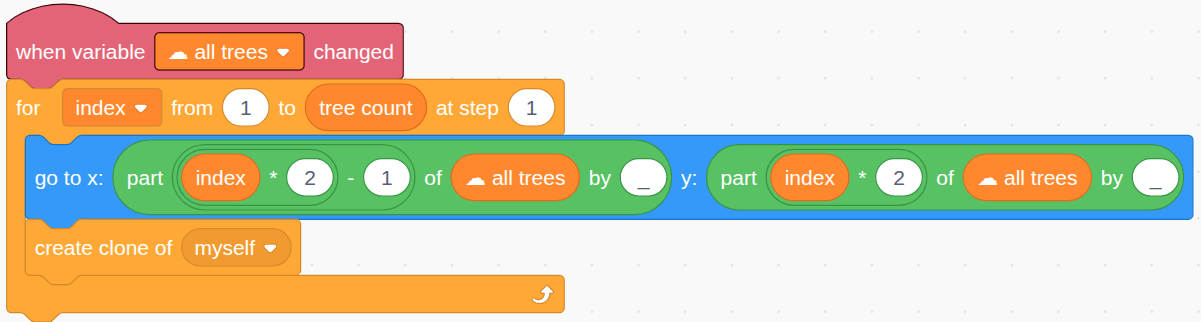
Step 10 - Create Tree Clones
To create each clone:
- Extract the x and y positions from the list using the
"part of by"block - Move the Tree sprite to that location
- Create the clone
Each tree takes up 2 entries in the list (x and y). So tree #1 uses part 1 and 2, tree #2 uses part 3 and 4, and so on.

Use a loop to process each tree:
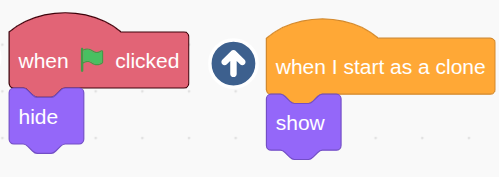
Step 11 - Hide the Original Tree Sprite
We’ll only use clones for the trees. Hide the original sprite and show each clone when it’s created:
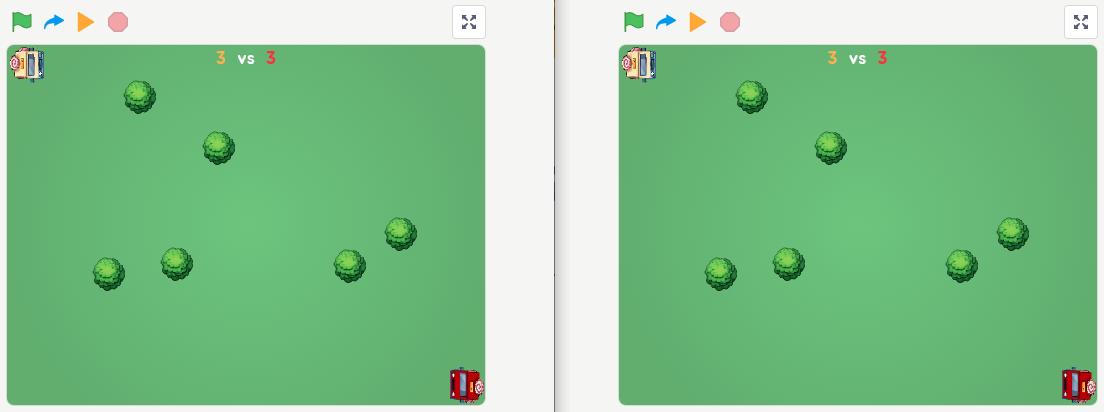
Now, test the game—you should see identical trees on both screens:
Step 12 - Add Sugar objects
Sugar objects restore a truck’s life when collected.
Unlike trees, Sugars appear dynamically during gameplay, and may also disappear if not collected. So they’re handled differently.
In the Sugar sprite, when
"add objects"is received:- Start a loop to randomly generate Sugar positions
- Each Sugar gets a unique ID
- A cloud variable
☁ new sugar infostores"ID_x_y"for the next clone

Key points:
- IDs start at 1 and increment
- Wait a random 30–90 seconds between Sugars
- This loop runs only on Player 1’s computer
Step 13 - Create Sugar Clones
On both computers, whenever
☁ new sugar infochanges, split it to get the ID and coordinates, then create a clone.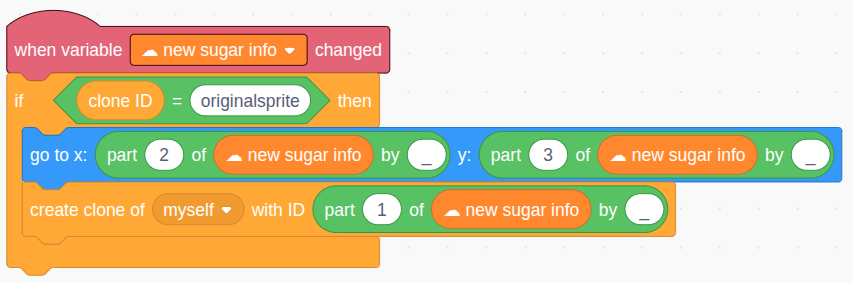
Before cloning, check the clone ID is “originalsprite” to avoid duplicate clones from existing ones.Use the first part (ID) to uniquely identify each clone.
Step 14 - Hide the Original Sugar Sprite
Just like with trees, hide the original Sugar sprite and show only its clones:
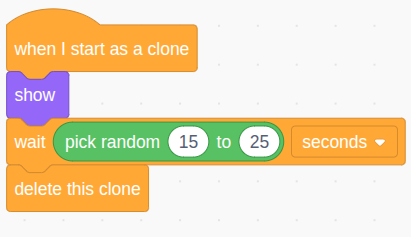
Step 15 - Auto-Delete Sugar Clones
Each Sugar clone will wait 15–25 seconds. If it’s not collected, it deletes itself:
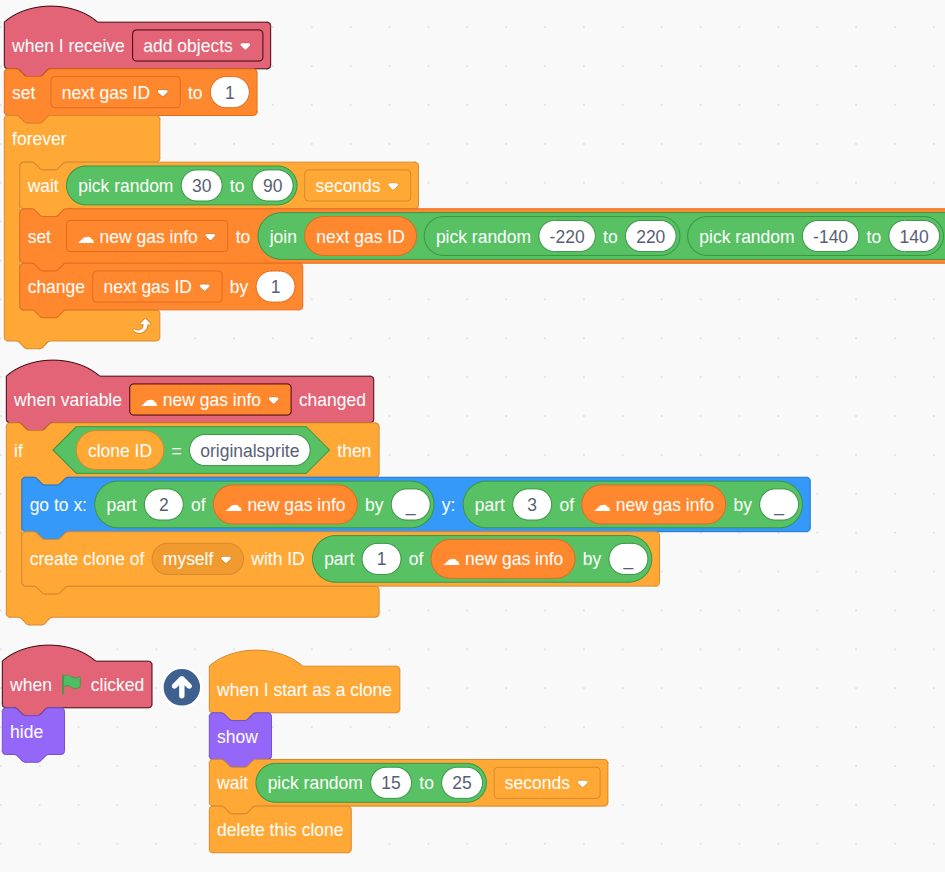
Step 16 - Add Gas Objects (Speed Boosts)
The Gas sprite works just like Sugar, but boosts the truck’s speed instead of restoring life.
Just duplicate the Sugar sprite’s code and adjust the variables:
next gas IDnew gas info- Any references to “Sugar” should be changed to “Gas”
Module 3 - Keyboard Control of the Trucks
Now that the game world is set up, it’s time to let players control their trucks using the keyboard. But remember, this is a two-player online game. That means when a player presses a key to move their truck, the same movement must happen in real-time on both computers.
We’ll accomplish this using cloud variables to send and sync movement commands.
Step 1 - Broadcast the “start game” Message
Once all objects are added and the game is ready, we need to let both players begin controlling their trucks. In the Setup sprite, broadcast the
"start game"message on both computers:For Player 1:
For Player 2:
In the Controller sprite, we’ll listen for this message and begin a
foreverloop to handle keyboard inputs: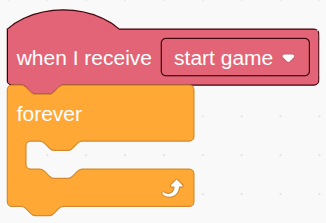
Step 2 - Detect Key Press and Set Command
Within the loop, check which arrow key the player is pressing:
1: Up2: Down3: Left4: Right0: No key is pressed (stay still)

This value is stored in the
new commandvariable.
Step 3 - Send the Command Only If It Changes
Since this loop runs continuously (many times per second), it could end up sending the same command over and over. That’s unnecessary and wasteful. So we’ll compare the current command to the last command sent, and only send a new command when it actually changes.
First, store the command 0 in a
current commandvariable initially:
Then, compare it with thenew command. If different, save this new command: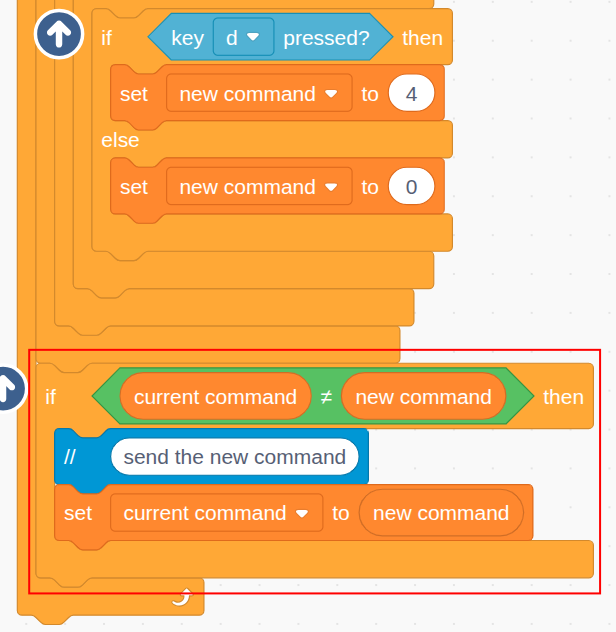
Step 4 - Send the Command to the Correct Truck
Each player controls one of the two trucks. Player 1 controls truck 1, and player 2 controls truck 2. On both computers, both trucks exist, so we need to ensure that only the correct truck clone receives the command from the player.
Here’s how we’ll do it:
- Use the
my teamvariable (1 or 2) to send a message with that same number - Attach the
new commandas the parameter (we have made sure this is different from before)
So Player 1 will send message
"1"with the command, and Player 2 will send"2":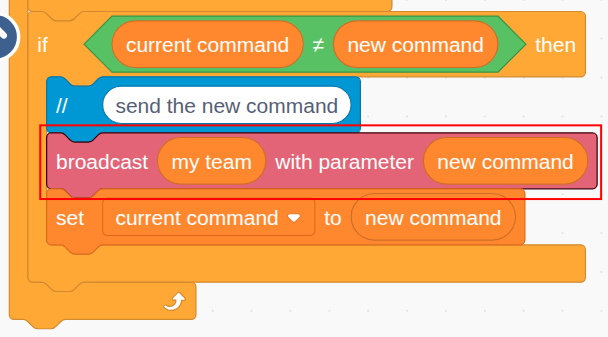
Step 5 - Let the Correct Truck Handle the Command
Switch to the Truck sprite.
All truck clones (ID 1 and ID 2) will receive the message
"1"or"2", but only the clone with the matching ID should actually respond. Use anifblock to check theclone ID.Then define a custom block called
handle commandthat will process the movement: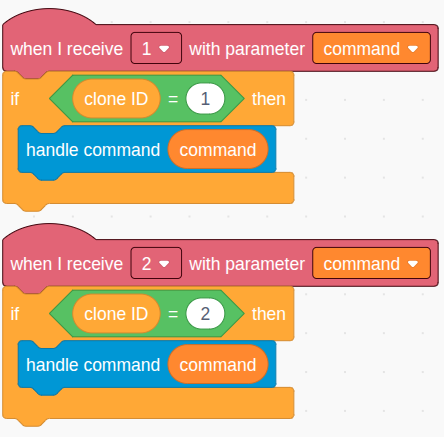
So if Player 1 presses a key:
- On Player 1’s computer, Truck 1 responds and updates its state.
- On Player 2’s computer, Truck 1’s mirror will also update its state.
This keeps both trucks behaving identically on both screens.
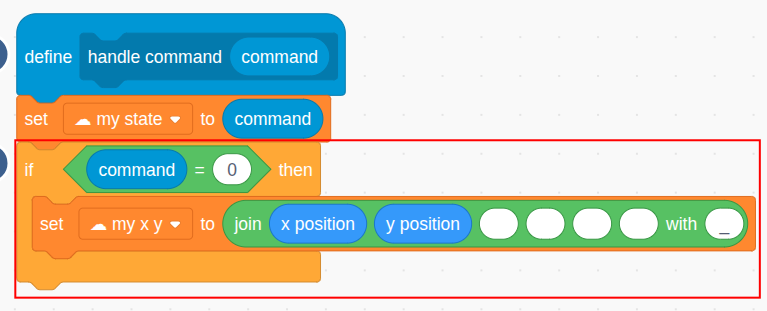
Step 6 - Set
☁ my stateCloud VariableInside the
handle commandblock, set the cloud variable☁ my stateto the command value: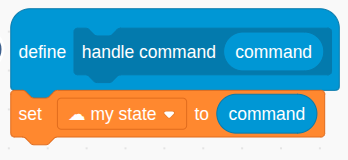
Each truck clone owns its own cloud variable. This variable is not visible to other clones or sprites locally—but because it’s a cloud variable, the value is automatically shared with the other player’s computer.
So the state of a truck is immediately synced across both computers. That’s how both players see the exact same movement for the same truck.
Step 7 - Calculate Travel Duration and Distance
Now we’ll build the movement loop. To ensure that truck speed is consistent across fast and slow computers, calculate how much time has passed between iterations of the loop using the timer.
Use that to determine how far the truck should travel:
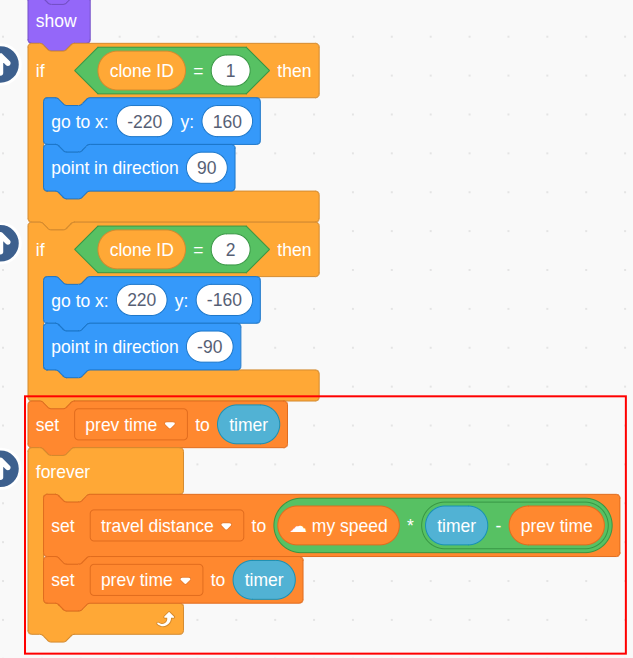
For example:
- On a fast computer, the loop might run 40 times/sec, so
travel duration ≈ 0.025 - On a slower one, maybe 20 times/sec, so
travel duration ≈ 0.05
Multiply speed by time to get consistent movement regardless of computer speed.
Step 8 - Move the Truck Up (State = 1)
Now use that travel distance to move the truck in the right direction. Start by handling state
1(move up)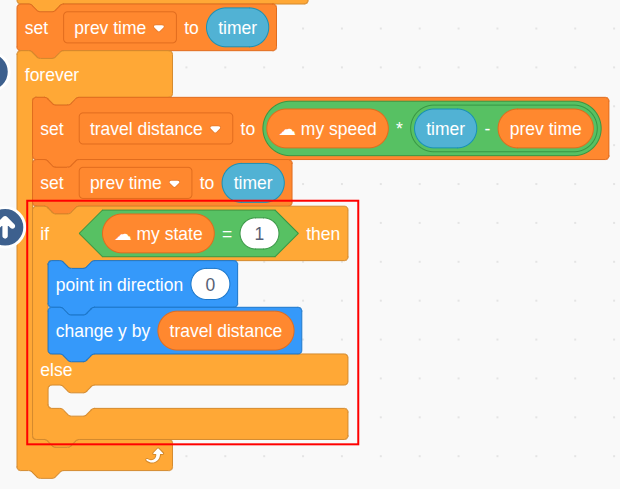
Step 9 - Move in the Other Directions (States 2–4)
Repeat this logic for states
2(down),3(left), and4(right):
No need to handle state
0directly—if no key is pressed, the truck simply doesn’t move.
Step 10 - Undo Movement if Hitting a Tree or Edge
If the truck hits a tree or touches the edge, immediately reverse the last movement:
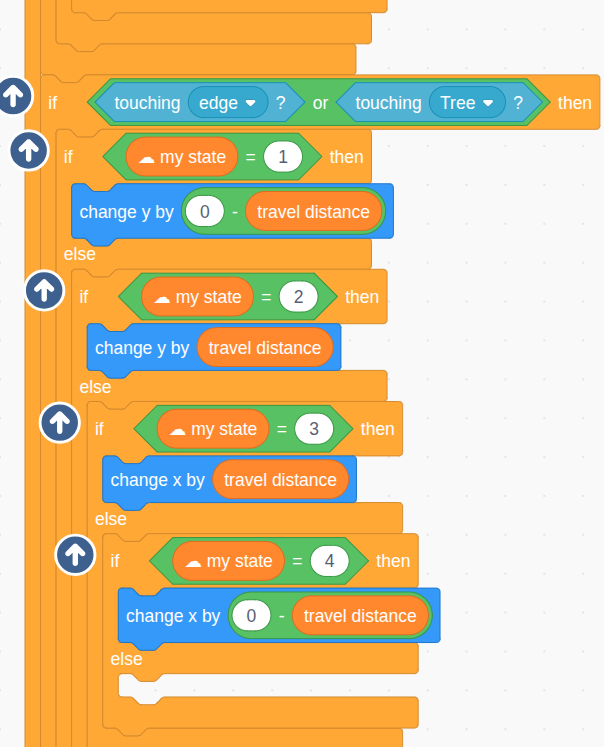
Put this logic at the top level inside the loop, so it always runs on every frame, regardless of what state the truck is in.
Step 11 - Sync Position When Truck is Idle (Command = 0)
Even with identical movement commands, trucks can drift out of sync over time due to slight timing delays. Here’s why:
Imagine Player 1 moves the yellow truck up, then presses right. The command is instantly executed on Player 1’s computer. But there’s a small delay (maybe 0.1 seconds) before that command reaches Player 2. So on Player 2’s screen, the yellow truck moves slightly farther up before turning.
To fix this, whenever a truck receives command
0(no movement), we broadcast its exact position to the other computer using a cloud variable☁ my x y(formatted like"x_y":")
Then, when the other computer receives this update, the matching truck clone updates its position smoothly:
This ensures both versions of the truck stay visually aligned.
Step 12 - Sync Position When Truck Hits Obstacle
When a truck hits a tree or an edge, it should stop moving—and sync its corrected position to the other computer. You can reuse the
handle commandblock by calling it with command0.But only the truck being controlled locally by the player should do this, because only that version has the accurate position. Add this logic inside the collision detection block, not at the top level:
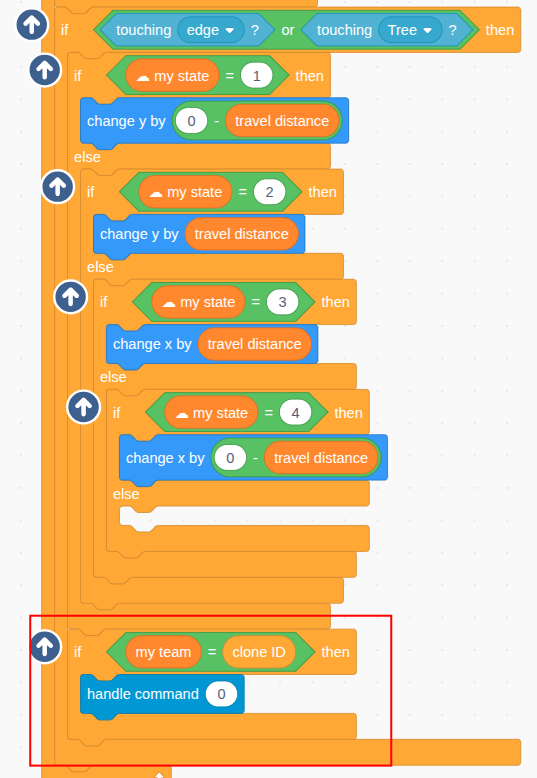
Now, both players will always see exactly the same movement, even when a truck hits trees or stop moving.
Here’s a demo of it in action:
Module 4 - Collecting Items
In this module, we’ll enable the trucks to collect Sugar and Gas items, which can increase the truck’s life or boost its speed. When a truck picks up one of these items, we need to make sure the effect happens only once, and that it syncs across both computers.
This means the item should disappear at the same time on both screens, and the truck’s speed or life must update only on the player’s own truck (not the mirrored one).
Let’s go step by step.
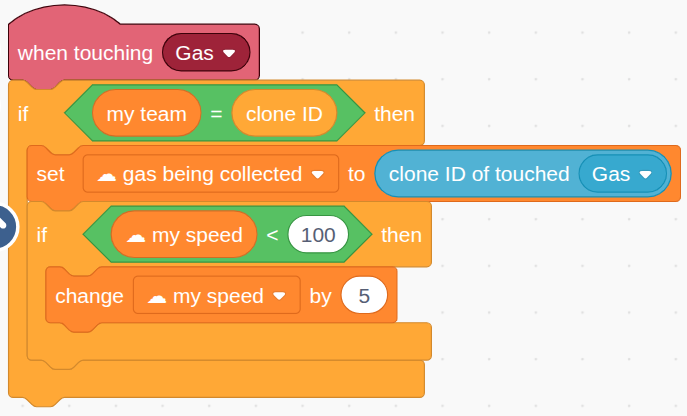
Step 1 - Detect Touching the Sugar
Start in the Truck sprite.
We’ll use the “when touching [object]” block to detect when the truck touches a Sugar clone. But there’s an important detail: each computer has two trucks (clone ID 1 and 2), and we only want the truck controlled by the local player to handle the collection.
So first, check that
my teammatches the truck’sclone ID. That ensures only the player’s truck reacts: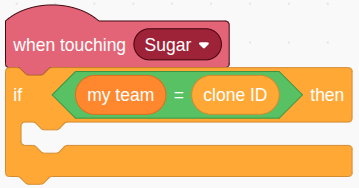
If you don’t do this check, both the original truck and its remote mirror might react, and the item could be collected twice incorrectly.
Step 2 - Notify Which Sugar Was Collected
When a Sugar item is collected, we want both computers to delete that Sugar clone. Since each Sugar clone has a unique ID, we can use a cloud variable to broadcast that ID.
Set
☁ sugar being collectedto the ID of the clone that was touched: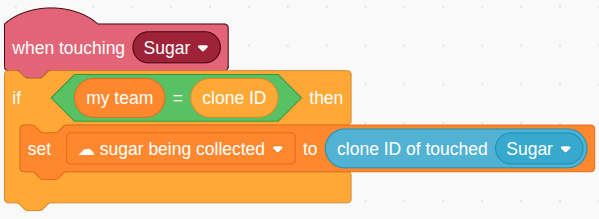
Once this variable changes, every copy of the Sugar sprite (on both computers) will be notified.
Step 3 - Increase Truck’s Life (Max 3)
After collecting a Sugar item, the player’s truck should gain one life—but only if its current life is less than 3.
Here’s the code to do that:
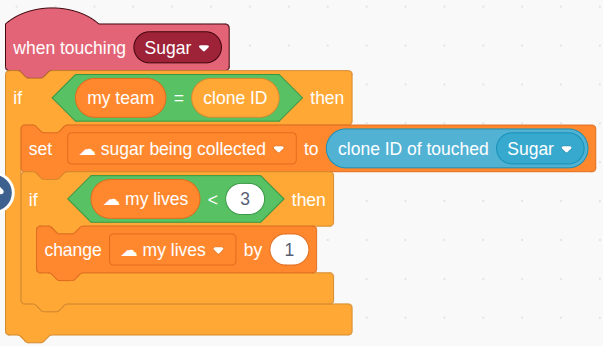
This check prevents the truck from going above the max life limit.
Step 4 - Delete the Correct Sugar Clone
Now switch to the Sugar sprite.
We want only the clone with the matching ID to delete itself when
☁ sugar being collectedchanges. Use thewhen [cloud variable] changeshat block, and compare the clone’s ID with the new value: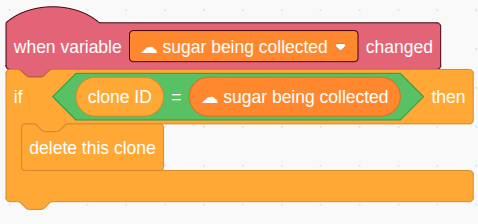
This event runs on both computers, but only the matching clone actually deletes itself.To make this detection work reliably, set
☁ sugar being collectedto an invalid ID at the beginning of the game, like-1or"none":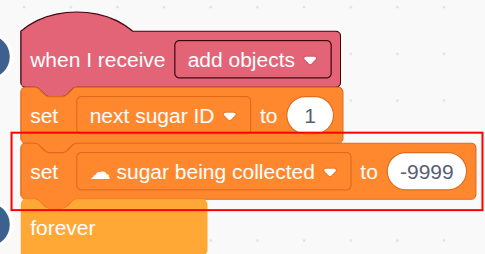
If you skip this step, the first clone might mistakenly delete itself before anything has been collected.Now test it out: try adjusting the Sugar spawn delay to appear more frequently so you can quickly see the effect during testing:
Step 5 - Handle Touching Gas Objects
Back in the Truck sprite, we’ll use similar logic to handle collecting Gas objects. These do not increase life—they increase the truck’s speed instead.
Duplicate the Sugar collection code and change it to work with Gas. When touched, increase the speed variable of the truck:
Again, remember to only allow the local player’s truck to trigger the collection.
Step 6 - Delete the Gas Clone
In the Gas sprite, add logic similar to Sugar. When the cloud variable
☁ gas being collectedchanges, compare its value to each clone’s ID. If it matches, delete the clone: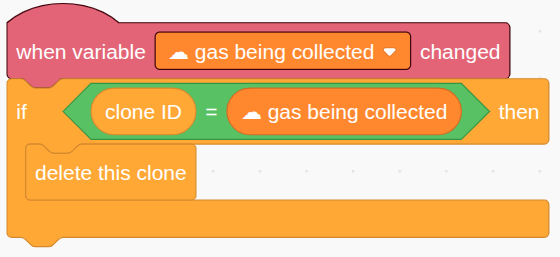
And just like with Sugar, initialize this variable to an invalid value at the start: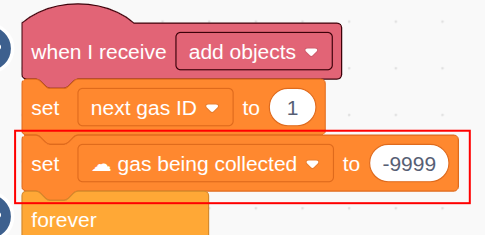
This avoids accidental deletions or unexpected behavior.Once you’ve added this code, try testing the collection of both Sugar and Gas. Make sure:
- Only one truck can collect the item (not the mirror)
- The effect applies only to that truck
- The item disappears on both screens
This logic is essential for keeping both players’ games perfectly in sync.
Module 5 - Shooting Donuts
In this module, we’ll let players shoot donuts from their trucks. Donuts travel in a straight line and disappear when they hit a tree, the edge of the stage, or the opponent truck. If a donut hits the opponent’s truck, it will lose a life. As always, everything must stay synchronized between both players’ computers.
Let’s walk through each part of the shooting mechanic.
Step 1 - Detect SPACE Key to Fire
In the Controller sprite, add a condition to detect when the player presses the SPACE key. When that happens, broadcast a
"shoot donut"message.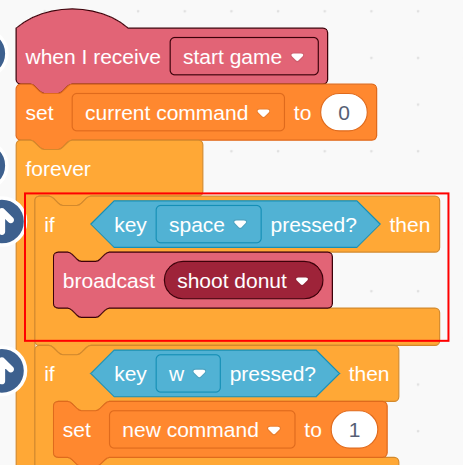
Step 2 - Only Original Donut Handles the Message
Switch to the Donut sprite. When the
"shoot donut"message is sent out, it will be received by both the original Donut and all its clones. So, add a check to make sure only the original sprite handles it: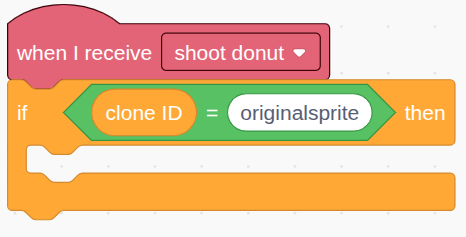
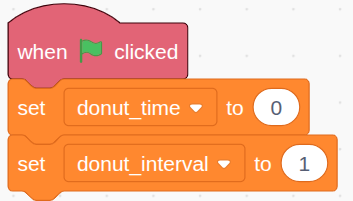
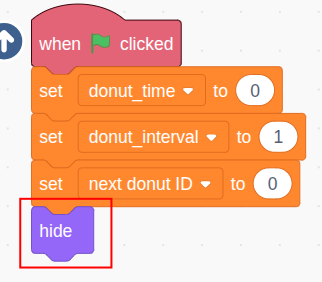
Step 3 - Limit Shooting Frequency
To prevent players from spamming the SPACE key, introduce a cooldown. Create two variables:
donut_time: last time a donut was fireddonut_interval: minimum wait time between shots (e.g., 1 second)
Initialize them like this:
And check the current timer value before allowing a new shot: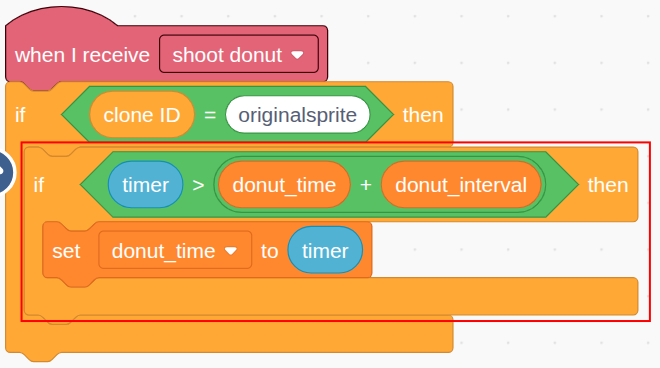
Step 4 - Get truck position and direction
A donut should appear at the front of the truck, facing the same direction. Use the sensing blocks to get the x/y position and direction of the truck the player is controlling:
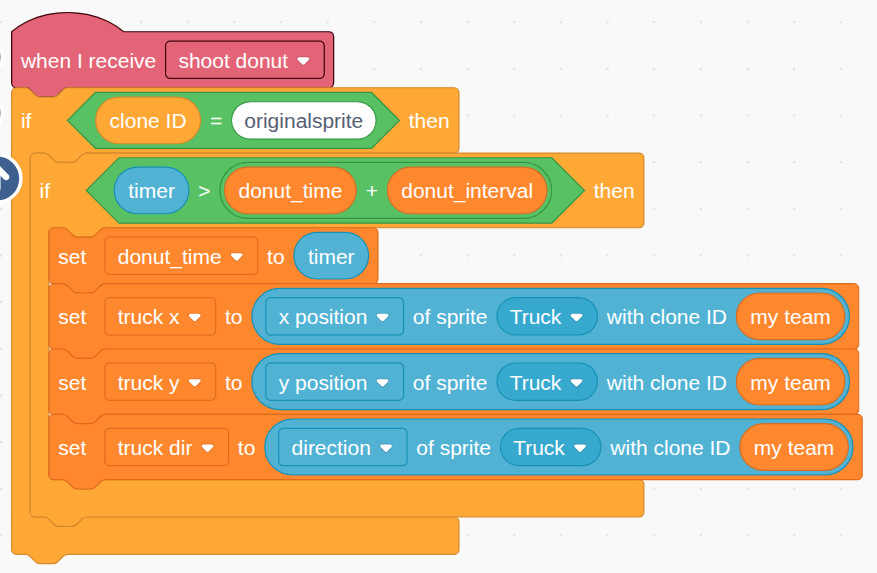
Usemy teamto access the truck clone ID that matches the player.
Step 5 - Track Donut ID
Each donut clone should have a unique ID. Use a variable
next donut ID, initialized to 0: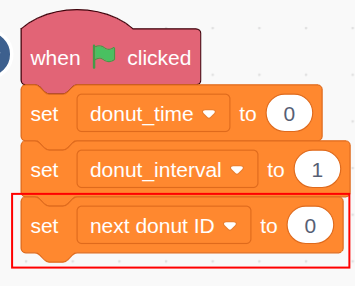
Increase it by 1 with each new shot:
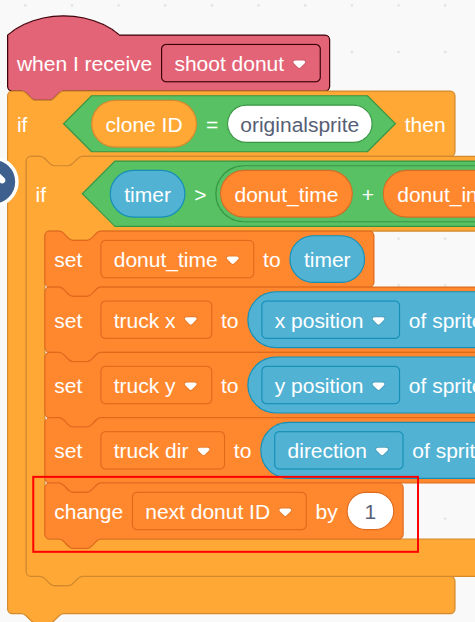
Step 6 - Create
☁ new donut commandUse a cloud variable
☁ new donut commandto let both computers know a new donut was fired.Its format will be:
playerID_direction_x_y_donutIDStart with the direction
90(right). Offset the x-position by 35 so the donut doesn’t touch the truck that fired it: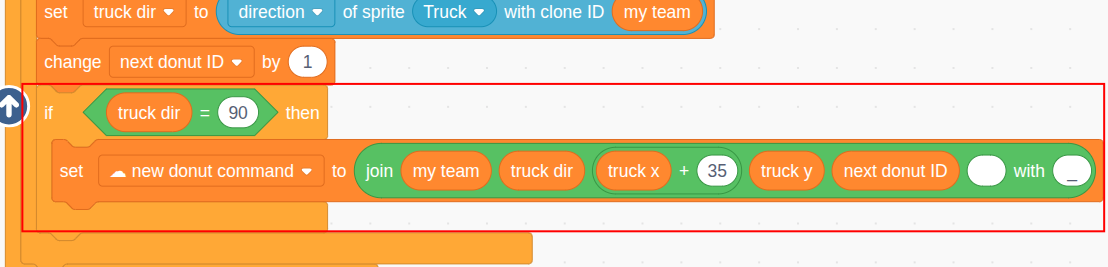
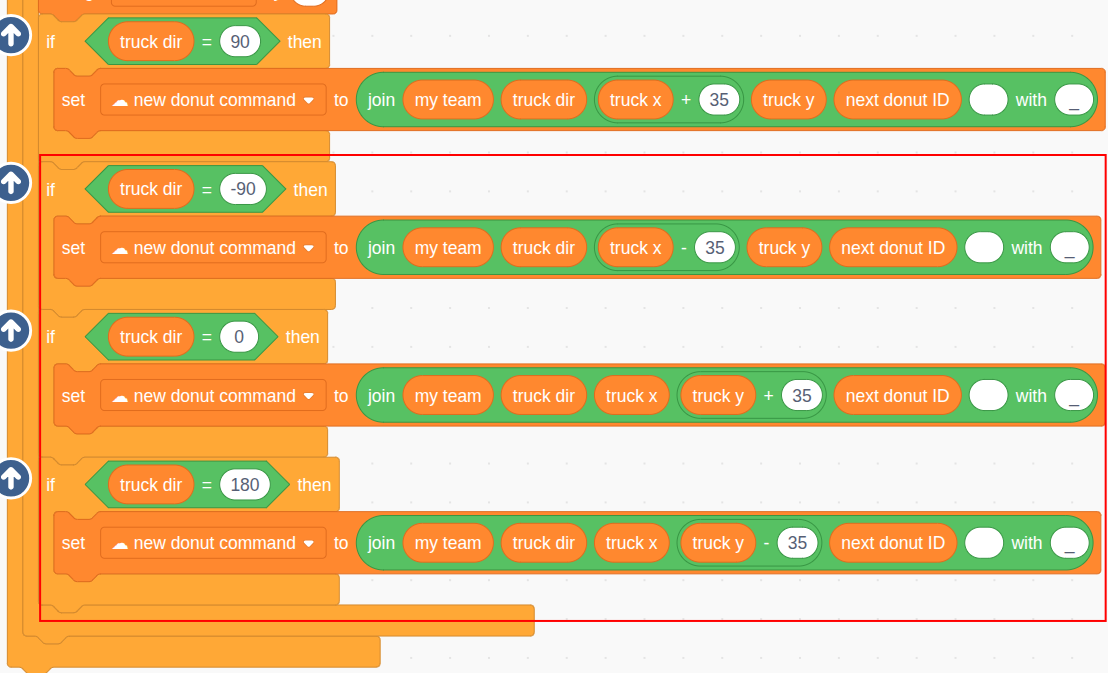
Step 7 - New donut commands for the other three directions
Repeat the same logic for directions:
0(up): adjust y180(down): adjust y270(left): adjust x
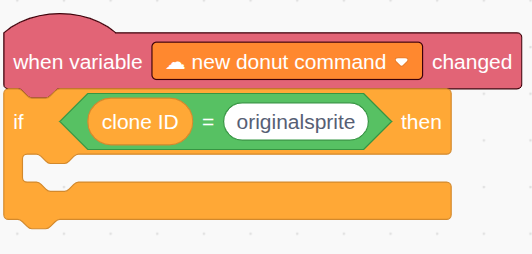
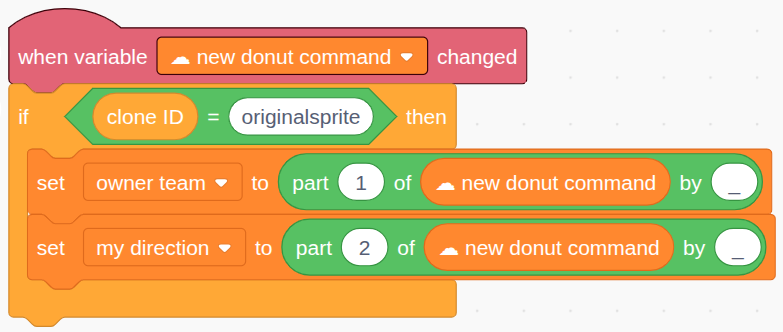
Step 8 - Handle updates in
☁ new donut commandWhen the cloud variable
☁ new donut commandchanges, both computers will create a new donut clone.Make sure only the original Donut sprite handles this:
Step 9 - Extract Donut Info
Split the command string into 2 parts and store them:
owner team: the shooting playermy direction: the direction the donut should move in
Step 10 - Move Donut to Position and Set Angle
Move the original Donut sprite to the target position and direction. The clone will inherit this when it’s created:
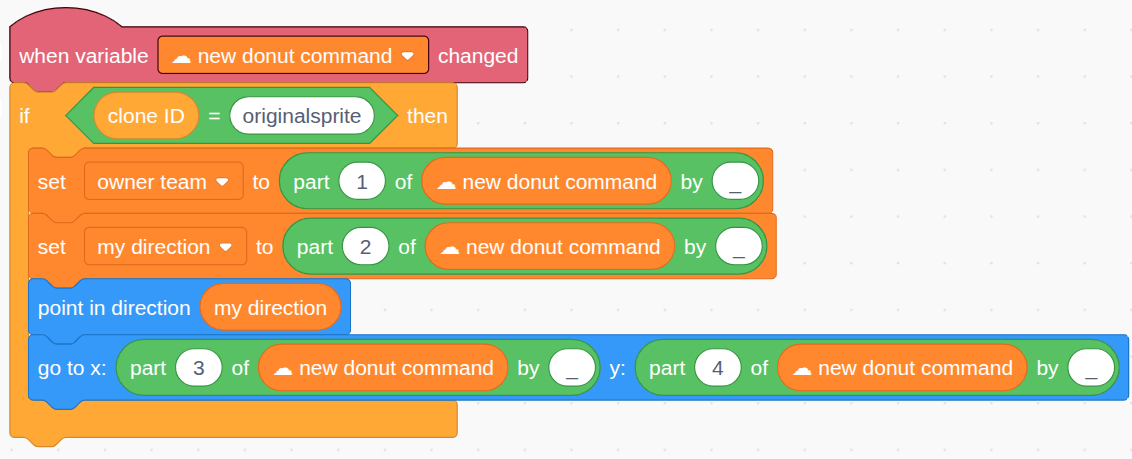
Step 11 - Create the Donut Clone
Now create the donut clone. Its ID will be a combo of the player’s ID and the sequence number:

Step 12 - Set Costume by Team
Set the donut costume based on the player who fired it:
Step 13 - Hide the Original Donut Sprite
Only clones should be visible. The original Donut stays hidden:
Step 14 - Calculate Travel Distance Based on Timer
Just like trucks, donuts should move consistently across fast and slow computers. Use the timer and a constant speed (e.g. 150) to calculate how far each donut moves every frame:
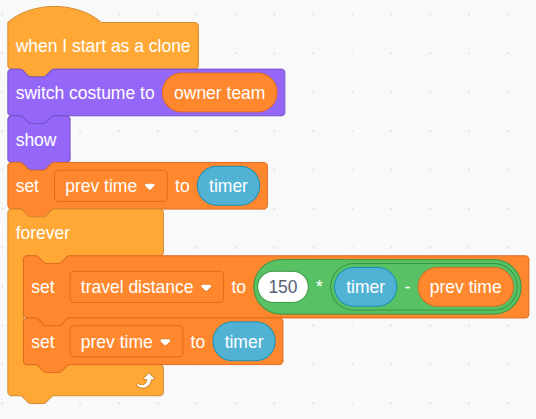
Each clone tracks its own
prev timeandtravel distance.
Step 15 - Move the Donut
Move the donut in its set direction using the calculated distance:

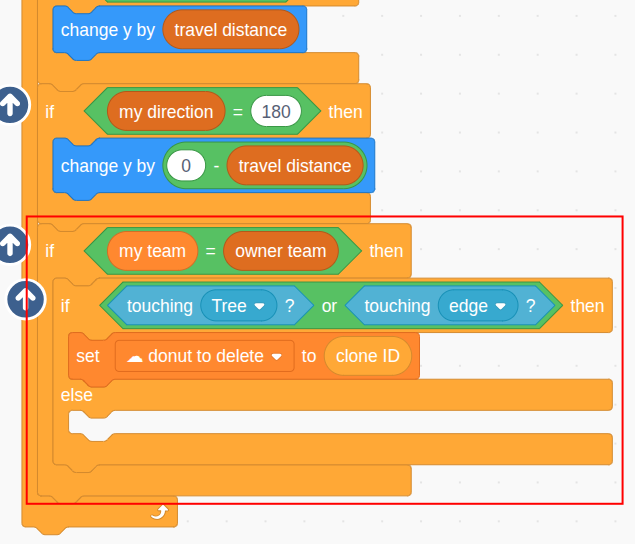
Step 16 - Delete on Tree or Edge (Only on Owner’s Side)
Only the player who owns the donut should check for collisions (to avoid false positives due to lag). If a donut touches a tree or the edge:
- Set
☁ donut to deleteto its ID - Both computers delete the clone when this variable updates
Step 17 - Detect Hitting the Opponent
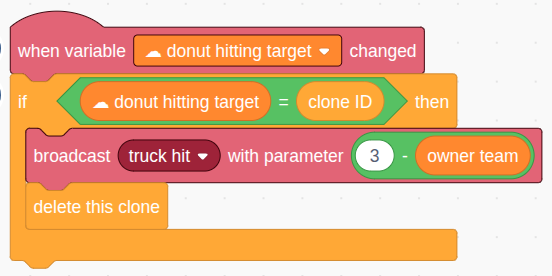
If the donut hits the opponent truck, do the same thing: set a cloud variable
☁ donut hitting targetto the donut’s ID: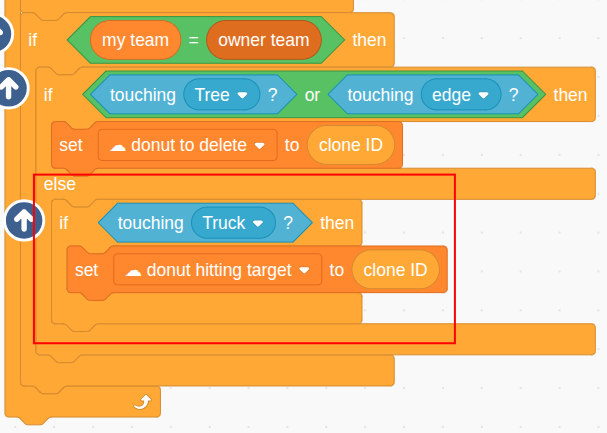
Step 18 - Delete the Donut
In the Donut sprite, when
☁ donut to deleteupdates, each clone compares its ID and deletes itself if it matches: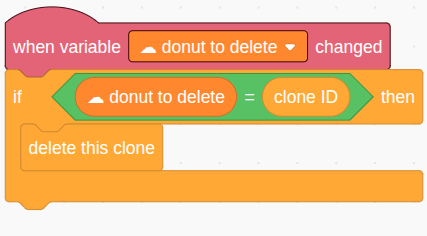
Step 19 - Handle Opponent Hit
Similarly, when
☁ donut hitting targetchanges, the matching clone:- Sends a
truck hitmessage with the opponent truck’s ID. For example, if this clone’s team is 1, then the opponent team’s ID is 2 (3 - 1). - Deletes itself
Step 20 - Truck Handles “truck hit”
In the Truck sprite, handle this message carefully:
Only the truck that got hit, and only on its own player’s computer, should reduce its life by 1.
Use two checks:
clone ID = truck being hitmy team = owner of this truck
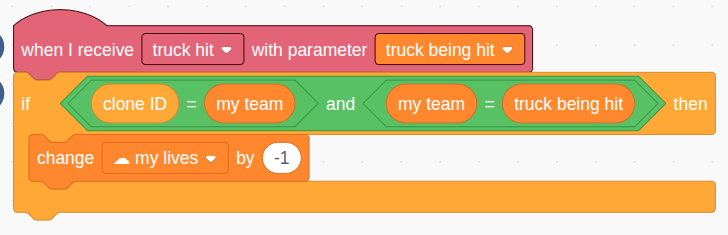
Then update☁ my lives, which is mirrored on both computers.
Step 21 - React to Changes in
☁ my livesEach truck that shares that cloud variable will react when
☁ my livesis updated.Make sure the game has started (game state is 1):
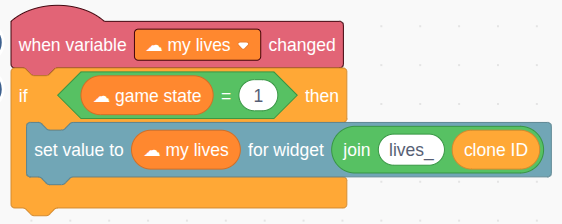
Step 22 - Compare Life Count
Use a separate variable
prev my lives(initially 3) to compare the new life count to the previous one: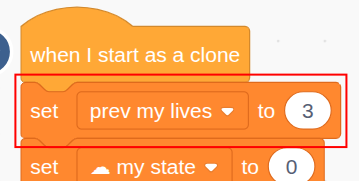
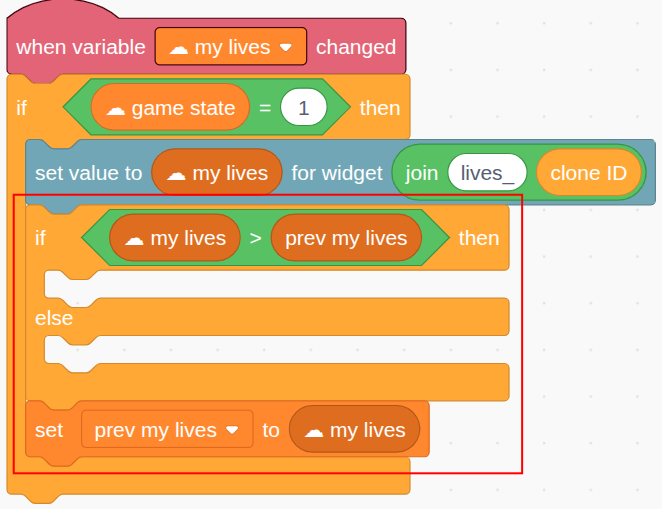
Step 23 - Play Sound Effect
Play different sounds for gaining vs. losing lives:
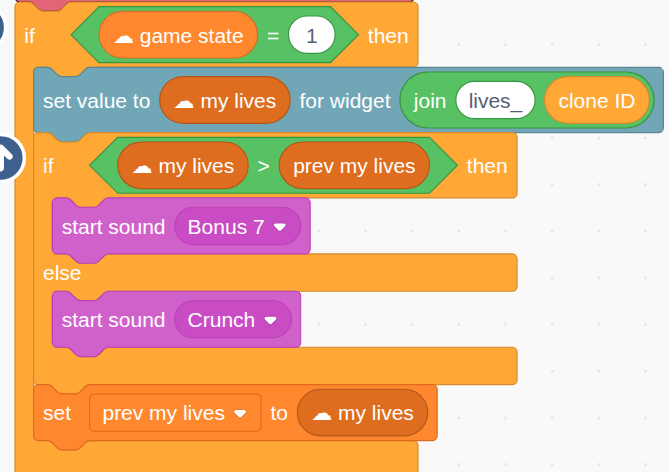
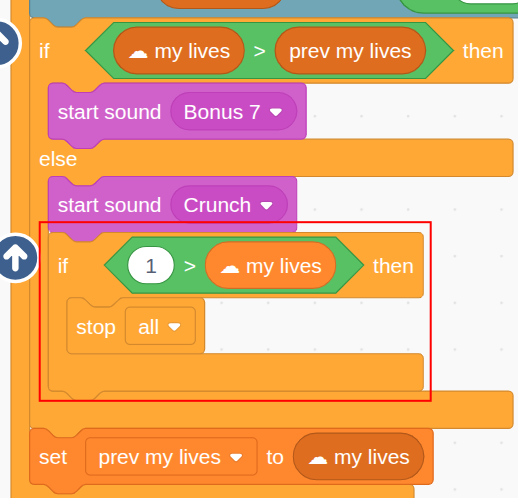
Step 24 - End the Game if Lives = 0
If the truck’s life count drops to zero, end the game. This check happens on both computers:
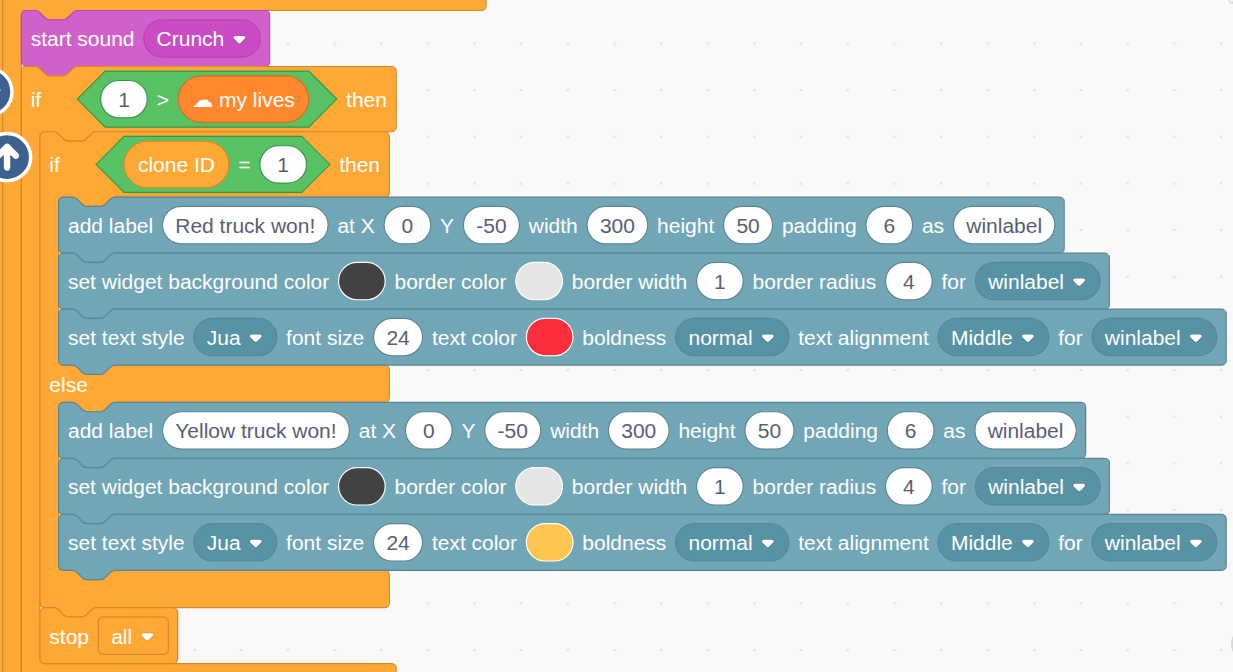
Step 25 - Show the Winner
Before stopping the game, show a message announcing who won:
If truck ID = 1, then player 2 wins. If it’s 2, then player 1 wins:
Here is a full demo of the game:
Additional Challenges
The game you’ve built so far is a fully functional 2-player battle, but there’s plenty of room to expand and experiment. The main goal of this project was to demonstrate how cloud variables and clones can be used to build a multiplayer game where each player runs the same project on their own computer, and everything stays in sync.
Once you’ve got the basic mechanics working, here are some ways you can extend and improve the game. These ideas range from simple tweaks to major redesigns—try one or try them all.
 Firepower Reward
You’ve already added Sugar and Gas as collectible items. Now try adding a third type of reward that affects the player’s shooting ability.
What to do:
- Create a new sprite for a Firepower item
- When collected, reduce the cooldown time between donuts (e.g., from 1 second to 0.5 seconds)
- Use a new cloud variable to sync this change across both computers
- Maybe even show a temporary fire effect or shooting animation
This reward adds more strategy and makes collecting items more impactful.
Shrinking ArenaTo prevent players from hiding or running away forever, you can create a shrinking play area—similar to battle royale games.
How it works:
- Add invisible wall sprites that slowly move inward from the edges of the stage
- These walls can appear every 10 seconds or after a certain time has passed
- If a truck touches a wall, it loses a life or takes damage
This forces players toward the center of the stage over time, making the game more intense and guaranteed to end eventually.
2 vs. 2 Team GameThis is a major upgrade: turn your 2-player battle into a 4-player team battle, with two players on each team.
What changes:
- Four players will join the same cloud session, each with their own truck (clone IDs 1 to 4)
- Players 1 and 2 are on Team Yellow, and Players 3 and 4 are on Team Red
- Each player only controls their own truck, but it has 3 mirror trucks on the other 3 computers
- Donuts can damage players from the opposite team, but not teammates
- The game ends when both trucks from one team have lost all their lives
What you’ll need to update:
- Session setup screen to support 4 unique player IDs
- Truck spawning logic to handle 4 clones and assign them to teams
- Donut logic to check for friendly fire and block it
- Life tracking and win condition logic to check if both teammates are eliminated
- Display a win message like “Red Team Wins!” when the condition is met
- Player 1 sets
-
I CreatiCode pinned this topic on
Hello! It looks like you're interested in this conversation, but you don't have an account yet.
Getting fed up of having to scroll through the same posts each visit? When you register for an account, you'll always come back to exactly where you were before, and choose to be notified of new replies (either via email, or push notification). You'll also be able to save bookmarks and upvote posts to show your appreciation to other community members.
With your input, this post could be even better 💗
Register Login